• Skip to primary navigation
  • Skip to main content
  • Skip to primary sidebar

The Vegan 8

  • About
  • Recipe Index
  • My Cookbooks
    • The Vegan 8 Cookbook
    • 8 Ingredient Desserts Ebook
  • SHOP
You are here: Home / Pies/Tarts/Crisps / Apple Hand Pies (Vegan, Gluten-Free, Oil-Free)

Apple Hand Pies (Vegan, Gluten-Free, Oil-Free)

2.2Kshares
  • Share
  • Tweet
  • Pin
Jump to Recipe Print Recipe

Vegan Gluten-Free Beautiful Apple Hand Pies to wow your guests this holiday! You only need 8 ingredients total to make this and it’s vegan, gluten-free and no butter or oil!

The only thing more delicious than a regular pie, is a hand pie. One that you can carry around and eat, no utensils needed. It’s not so easy creating a vegan, gluten-free pie crust that has no butter or oil and actually TASTES good and tastes buttery and crispy……ya know, how a pie crust should taste! This recipe inspiration came from one of my most loyal readers, Estee. She makes so many of my recipes and shares them with so many people, so I’m honored to create something for her when she requests it. I’m honored to create anything for you guys, actually. I’m going to show you how to make some amazing vegan, gluten-free, oil-free Apple Hand Pies!

She sent me this recipe of Apple Pie Bites and requested that I make a healthy, vegan version. Challenge accepted. Soooo, these are obviously, COMPLETELY different, haha. Not exactly the same, they are pies, more than croissant bites. But sometimes, a recipe speaks to me, it really does, and this one was just screaming hand pies. I tested many different flour combos for the crust and none of them made me very happy as a pastry/croissant type of crust.

HOW DO YOU MAKE A VEGAN APPLE PIE?

I did manage to create an absolutely, delicious “buttery” pie crust though. It’s like those handheld pie crusts, but oil-free and gluten-free. This is not a fat-free dessert though. I have tried fat-free crusts and it is like eating cardboard….horrible texture, too chewy and not crispy…I personally don’t like eating cardboard.

So with lots of trials later, we have these amazing, hubby-devoured-them-super-fast Vegan Gluten-free Apple Hand Pies. Yes, please. My husband’s very favorite dessert I make, is my Apple Cinnamon Pecan Crisp. He absolutely loves baked apples in any form, so if he gave these mini hand pies a giant mouthful thumbs up, it’s a winner!

I also created an amazing just 2 ingredient flour combo! That’s basically unheard of for a gluten-free pie crust, as they usually alone are 4 or 5 flours. My combo is simply tapioca starch and white rice flour (not brown). The magic is the ratios. After many fails of crumbly, too dense, too chewy, too dry or too this and that, this was the winning combo. These flours CANNOT be subbed. Tapioca becomes like glue once it’s wet and so does rice flour and white rice flour binds better than brown rice.

HOW DO YOU MAKE AN OIL-FREE PIE CRUST?

Pecan butter! Pecan butter was a secret I discovered while winging it in the kitchen 3 years ago when I created these Pecan Butter Chocolate Chip Cookies. They make those cookies soooo darn buttery and crispy, that I’ve been obsessed with pecans ever since.

Pecan butter is crucial to use instead of just ground up pecans into a flour, because the pecan butter specifically is very smooth and light and creamy and acts as the oil here with the flours, as opposed to oil or butter. We are looking for an actual, workable gluten-ish pie dough, not just a crumbly type texture. The pecan butter also helps to bind the dough. Also, no other nut butters will work, so don’t even think about subbing. Pecan butter is naturally the oiliest of all nut butters, is much softer and lighter, as other butters are too stiff and dense. I tested both cashew and almond butter and they failed.

Now, I’m going to take you on a not-so-traditional gluten-free pie making tutorial. Contrary to every typical gluten/butter pie recipe out there, you do not need cold water or chilled fat to make this dough. In fact, my process is the opposite, as you need hot water. Why? Well, since there is no gluten in my recipe, I needed to make my flours (I only used 2!) work to their maximum power. Adding hot water to rice flour and tapioca makes them gluey, as opposed to just cold water. The whole dough itself is not like traditional, it’s thicker, stickier and looser, but once it chills, it becomes magically firm and much easier to make little pies.

Now, because I love making things easier for you, I took a whole lot of photos to give you all a visual step-by-step photo tutorial to make it easy for you all. I know it is very beneficial…so here we go! Lots of pics, but I wanted to show each detail.

HOW TO MAKE VEGAN GLUTEN-FREE APPLE PIE STEP-BY-STEP 

First, make the pecan butter using raw pecans. It only takes about 10 minutes. You can make this the day before making the pies and keep it stored at room temperature. Add 2 cups raw pecan halves to a food processor and process into a flour. Scrape down the sides and process for about 10 minutes or so until it is very, very smooth and creamy. You will need to scrape down the sides a couple of times during. Do not stop processing once it is a paste, you need to keep going until it is very soft and smooth. Think, the consistency of a very soft buttercream frosting. It feels softer than it looks too. It should be smoother than almond butter, almost oily. If it’s not, then it won’t moisten the dough enough in the next step. Store at room temp before making dough.

Next, make your dough. This step only takes 10 minutes. Add the tapioca starch, rice flour, coconut sugar and salt to a clean/dry food processor. Use a scale for accurate results. Pulse just to blend together. Measure out only 1/2 cup of the pecan butter. Make sure you completely level this off of the measuring cup for accuracy in the dough. Add the 1/2 cup pecan butter, 6 tablespoons hot water (I warmed my water for 30 sec in the microwave) and vanilla. Process until it all comes together into a really sticky dough, resembling stiff, thick peanut butter, a few seconds. Scrape the sides and process once more for a few seconds until all flour is blended. It should look like the above photo, if it is crumbly, then you mis-measured or forgot the water or your pecan butter wasn’t smooth enough. It should be very gooey. It will not look like a traditional pie dough yet, it will be more sticky and loose, but will firm up magically in the chilling step. Do not be tempted to add extra flour!

Scrape all of the dough out of the processor and wrap your dough in plastic wrap and shape into a ball. Place in the freezer for 2 hours. It will become magically firm and easy to roll out and make your crust shapes. If you are making this the day before you are making the actual pies, then just store the dough in the fridge instead.

Make your apple pie filling. While the dough is chilling, make your filling. This can also be made the day before you are baking the pies, to save time. Just store in the fridge. Peel and chop up 1 granny smith apple into 1/2 inch cubes. These are more sour than other apples and I find they work best in the pies.

Cook your filling. Add the spices, sugar and water and turn to medium heat. Once it starts to sizzle, immediately turn to the lowest heat, cover and let cook for just 5 minutes. This is only to slightly soften them, so they are fully cooked after baking. Let completely cool before making your pies.

Pie making time. Remove your chilled dough from the fridge. Seeeeee, I told you it would magically firm up and look just like regular dough! Use the cold dough immediately so it’s easy to work with. You don’t want to remove it from the fridge until you are ready to use it.

Roll out the dough. Place the dough onto a piece of parchment paper. Place another piece of paper on top and roll out into a large round-ish shape, 1/8 inch thick. Do this easily by rolling out from the center of the dough, to the edges, repeatedly.  You don’t want it any thinner than 1/8 inch or the dough can break. You also don’t want the dough too thick, or you won’t have enough for 10 pies. The dough is delicate, but works amazing. Your dough should be fine after chilling that long, but if it’s too sticky, freeze a bit longer.

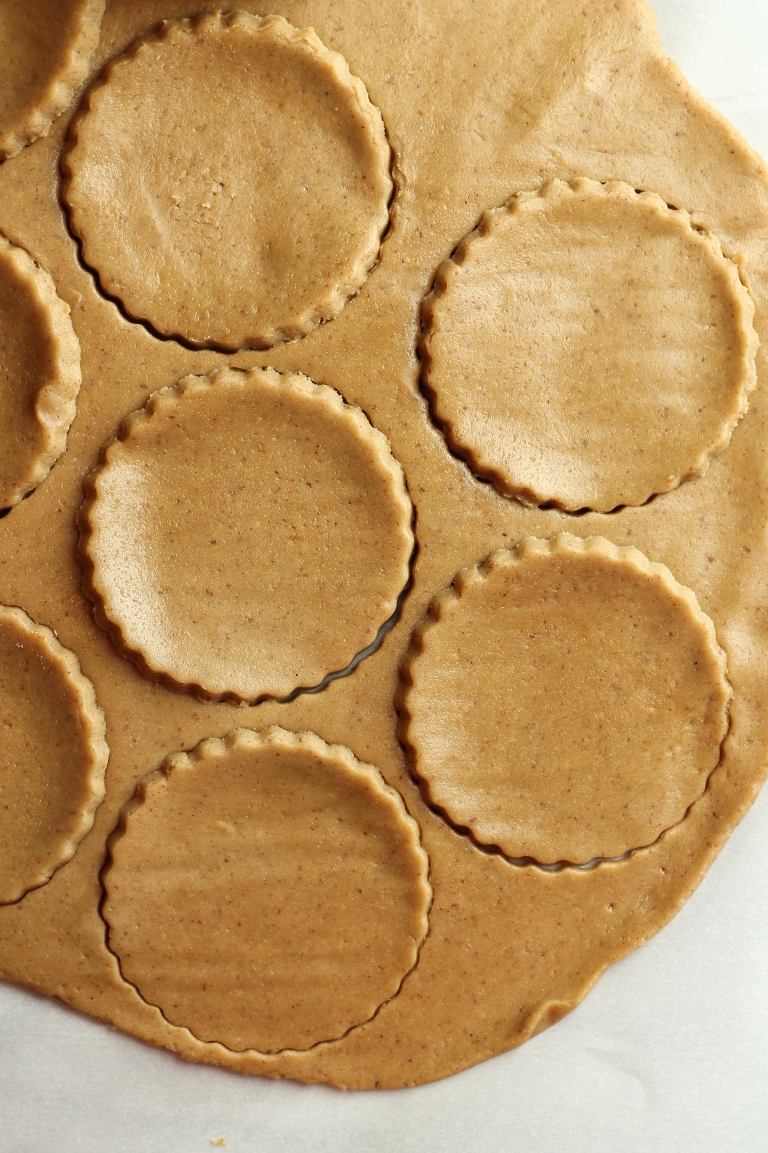
Cut out your pie crusts. Using a round 3 inch cookie/biscuit cutter, make 20 circles. I used a biscuit cutter that is 2.75 inches. Place 10 of them onto a parchment paper lined sheet pan that you will use to bake them on. It helps to remove the circles by peeling away the surrounding dough around it first, then they are easier to pick up. Keep reusing and re-rolling out the dough until you have 10 pies (20 circles). See recipe below for full instructions.

Form your pies. Scoop about 1 tablespoon of the apple pie filling onto the center of each bottom piece, spread out, leaving a little space (about 1/4 inch) to seal the edges. Be careful about overfilling them, or the tops will break and ooze out. Add a few of the pecan pieces as well. You should have just enough filling for 10 pies.

Add the tops. Place the tops on gently and press down the edges with your fingers. It sticks very easily together. Use damp fingers if necessary. If any of the dough slightly cracks, just dampen a finger and smooth it back out. For decorative edges, you can crimp them with a fork. Tap around the edges in quick motions with the fork if it’s sticking at all, this makes it easier. Lastly, with a sharp knife, cut a tiny slit opening on the tops of each pie, this will allow a little steam to escape. The slit should only be about 1/4 inch.

Decorate the tops. Lightly dampen a pastry brush with water and brush the tops of each pie, just to moisten them, so the sugar will stick. Sprinkle extra apple pie spice or cinnamon and raw sugar (or coconut sugar) all over the tops. Don’t be shy with the sugar. The pies themselves are mildly sweet, so this is where the nice sweet bite comes from.

Bake the pies. See Recipe below for details on baking. Then you will end up with these beauties!

And, of course, we need an inside shot of that deliciousness!

Phew, that was a lot of work sharing a photo for each step, but I really wanted to help you all out with detailed photos and instructions. These are really simple to make, just a little prep work, which I think is worth it for the holidays!

Vegan Gluten-Free Apple Hand Pies

Brandi Doming
You only need 8 ingredients for this entire recipe (+salt & water), as the same ingredients are repeated in both the filling and dough. These are a much healthier take on hand pies, as they are made with pecan butter instead of oil or butter, giving them a wonderful "buttery" depth of flavor and crispy texture.
5 from 16 votes
Print Recipe Pin Recipe
Course Dessert
Cuisine American, Gluten-free, Vegan
Yields 10 hand pies

Ingredients

PIE DOUGH

  • 1/2 cup raw pecan butter (SEE DIRECTIONS)
  • 1 cup + 2 tablespoons (136g) tapioca starch (other starches do not work here)
  • 1/2 cup (80g) white rice flour
  • 7 tablespoons (63g) coconut sugar
  • 1/4 + 1/8 teaspoon fine sea salt
  • 1 teaspoon vanilla extract
  • 6 tablespoons hot water (helps make the rice and tapioca flours become like "gluten")

FILLING

  • 1 granny smith apple, peeled & chopped (you'll need about 1 1/4 cups of 1/2 inch cubes, 130g)
  • 4 tablespoons (36g) coconut sugar
  • 1 teaspoon apple pie spice (storebought blend, or see note below for sub)
  • 1 tablespoon water
  • 1/4 cup chopped pecan pieces

TOPPING

  • 1 tablespoon or so of Raw sugar and extra spice for sprinkling

APPLE SPICE BLEND

  • If you can't find the apple pie spice, then just combine 3/4 teaspoon quality cinnamon, 1/8 teaspoon ground nutmeg and 1/8 teaspoon ground allspice

NOTE

  • As always, use a scale for accurate results with gluten-free baking, to avoid room for error. I tested these pies with different starches and flours (with many fails!) and this is the best combo. It's crispy, buttery and has good structure. Therefore, I do not recommend subbing whatsoever. Both tapioca and rice flour perform very differently in dough form than other flours and are crucial. The pecan butter is crucial, as it's much more oily than other nut butters, which make it work in this crust. Another nut butter will not yield the same results, I tested.
  • I use this scale.

Instructions
 

  • This pie dough will also work for a full size 9 inch pie for my Best Vegan Pumpkin Pie. Just follow the same steps here for making the dough and after chilling it, roll the dough out in between 2 pieces of parchment paper (see photos above) to about 10-12 inches round, 1/4 inch thick. Peel off the top paper and lift up the bottom piece of parchment and carefully flip over the dough onto a greased 9 inch pie dish. Press the dough into the pie dish smoothly and piece together any cracks. Gently prick the bottom of the pie dough several times with a fork ONLY if needing a fully baked crust like for a no-bake pie, like this Vegan Chocolate Cream Pie, bake at 350°F 15-20 minutes until it is light golden brown on the edges and the bottom looks cooked and dry. If using this dough for my pumpkin pie or another pie that bakes a long time, do not prebake it.
  • Time saving tips: You can make both the pecan butter and the dough the day before you bake the pies, then it all comes together really fast. You can even make the filling the day before as well and just keep stored in the fridge.
  • First, make the pecan butter which only takes 10 minutes. Store-bought does not work, it's too oily. Use raw pecans and not roasted, because the roasted are too oily. Add 2 cups raw pecans to a food processor and process into a flour. Scrape down the sides and process for about 10 minutes until it is very, very smooth and creamy. You will need to scrape down the sides a couple of times during. Do not stop processing once it is a paste, you need to keep going until it is very soft and smooth and the consistency of a soft buttercream frosting. It should be smoother than almond butter, more oily. If it's not oily enough, then it won't blend properly with the flours! You will have extra, but will only need 1/2 cup for the dough.
  • Clean and dry out your food processor before the next step. The pecan butter should be cooled and at room temperature before the next step, so that's why I recommend making it earlier.
  • Next, make your dough. Add the tapioca starch, rice flour, coconut sugar and salt to a clean/dry food processor. Pulse just to blend together.
  • Measure out only 1/2 cup of the pecan butter and add to the food processor, with the 6 tablespoons hot water (I warmed my water for 30 sec in the microwave) and vanilla. Process until it all comes together into a really sticky dough, resembling thick peanut butter, a few seconds. Scrape the sides and process once more. It will not be like a traditional pie dough, it will be more sticky, truly like peanut butter, but will firm up a TON in the chilling step. Do not be tempted to add extra flour! Refer to photo for texture.
  • Scrape out your every bit of dough onto plastic wrap. Wrap it up and form a ball and place in the freezer for 2 hours. The dough will be too sticky to use immediately. If wanting to store the dough overnight, store in the fridge instead of the freezer. Do not remove until ready to use right away.
  • While the dough is chilling, make your apple pie filling. Add the chopped apples, apple spice blend and coconut sugar into a small pot and stir around to coat all the apples. Add the 1 tablespoon water and stir. Turn the heat to medium. Once it starts to sizzle, immediately turn to the lowest heat, cover and let cook for just 5 minutes, just until the apples have began to soften and looking syrupy. You just want to slightly cook them, so they will be fully cooked after the oven baking step. Let the filling cool off.
  • Preheat an oven to 350°F (177°C) and line a pan with parchment paper.
  • Unwrap the chilled dough and use immediately. Place on a large piece of parchment paper, add another piece on top of the dough and roll out into a large round piece at 1/8 inch thick, rolling out from the center of the dough, to the edges. Follow above photo tutorial as a guide. You also don't want the dough too thick, or you won't have enough for 10 pies. Using a round cookie cutter or glass about 3 inches in size, cut out 20 circles. I used a biscuit cutter that is 2.75 inches. Keep re-rolling out the dough until you've made 10 pies.
  • Place each bottom dough piece onto the parchment lined pan. Scoop about 1 tablespoon of the apple pie filling onto the center of each piece, spread out, leaving a little space to seal the edges. Be careful about overfilling them, or the tops will break and ooze out. Add a few of the pecan pieces as well. Place the tops on gently and press down the edges with your fingers. It sticks very easily together. Use damp fingers if necessary. If any of the dough slightly cracks, just dampen a finger and smooth it back out. For decorative edges, you can crimp them with a fork. Lastly, with a sharp knife, cut a tiny slit opening on the tops of each pie, this will allow a little steam to escape. The slit should only be about 1/4 inch.
  • Lightly dampen a pastry brush with water and brush the tops of each pie, just to moisten them, so the sugar will stick. Sprinkle extra apple pie spice or cinnamon and raw sugar (or coconut sugar) all over the tops. Don't be shy with the sugar. The pies themselves are mildly sweet, so this is where the nice sweet bite comes from.
  • Bake for 13-15 minutes, just until the tops are firm and no longer soft. Mine were perfect right at 15 minutes, but your oven may take a minute less or more. Just keep an eye on them and feel the tops for a crisp touch. Transfer to a cooling rack. Eat while warm. These hold up perfectly, just like a gluten-filled pie crust. Keep leftovers in a sealed container. Reheat them in a low heat oven just until warm and crispy again. They will not be crispy if reheated in the microwave, but soft & chewy, but still delicious.
Tried this recipe?Tag @thevegan8 on Instagram and use tag #thevegan8!
Keyword apple hand pies, gluten-free apple pie, vegan apple pie

Filed Under: Christmas, Dessert, Gluten-free, Holiday, Pies/Tarts/Crisps Tagged With: Apple, cinnamon, Gluten-free, Pecan butter, Pecans, Pie, Rice flour, Tapioca

Previous Post: « Easy Dairy-free Alfredo
Next Post: The Vegan 8 Thanksgiving Roundup. All Recipes Vegan, Gluten-free and Oil-free! »

Reader Interactions

Comment and Rate This Recipe Cancel reply

Your email address will not be published. Required fields are marked *

Recipe Rating


This site uses Akismet to reduce spam. Learn how your comment data is processed.

Comments

  1. Florian @ContentednessCooking

    November 19, 2015 at 4:22 pm

    Those look beautiful, Brandi! I have to admit, I’ve never make or tried pecan butter before, time to change! 🙂 Love to read your story about Estee, that this recipe is for her so amazing! I recently posted some apple recipes like my sweet potato soup with kale, easy vegan apple cake, baked apples, so you know I’m a big apple fan, too. Love that you use such an easy gluten-free dough without 5 different flours in one recipe and the fact that you make your own pecan butter, homemade is the best. Gorgeous recipe as always!

    Reply
    • brandi.doming@yahoo.com

      November 19, 2015 at 5:10 pm

      Thank you so much Florian! Yes, apples are my very favorite fruit…well the only fruit I like to eat in whole form and there is nothing better than baked apples, and these are to die for! You have to try pecan butter! It’s not even comparable to other nut butters and I’ve been obsessed with it for 3 years, very sweet and buttery flavor!

      Reply
  2. Angela@Canned-Time

    November 19, 2015 at 4:22 pm

    Oh my.
    I’m thinking if God asked for a dessert one night it would surely include apples and spices ?
    My husband doesn’t do crusts, sweet r savory, so thses gems would be perfect for me to make up and then freeze most to thaw out and enjoy as I needed. LOVE your pics of course but these cuties make them even more delectable to look at this morning.
    I may have to make up my first batch if pecan butter with some of the Oklahoma pecans Annie sent me just to try out your dough as well!
    Sounds so tasty and good for us as well.
    Thanks Brandi ?

    Reply
    • brandi.doming@yahoo.com

      November 19, 2015 at 5:35 pm

      Awww you are so sweet Angela!! Thank you so much, so glad you love these photos!! I know there are a ton, but with dough and pie making and all, I thought it would help everybody to see the details and my readers always say they love the detailed instructions, so I thought I’d attach the photos this time 🙂
      Pecan butter is so amazing! My favorite way is roasted, sweeter and smoother, but for this I needed it raw because my original roasted pecan butter would be too oily for this dough. Thank you again!

      Reply
  3. Christina

    November 19, 2015 at 5:26 pm

    Wow these look incredible. What brand food processor do you have? I seriously need to buy one but I want to get one that is of good quality and does the job well. Love the recipes with pecan butter because I can actually eat those nuts. For some reason almonds and cashews I can’t eat. Most other nuts I can eat, so weird. On your pumpkin pie cookies I am gonna make next week I am making one batch with almond butter for everybody else and one batch with pecan butter for me. 🙂 Of course I will share my batch. 🙂 These little pies are perfect for the holidays. If I end up being able to get a food processor soon maybe I will make these next week too. Man I wish I lived with you hahaha. I would be so well fed. 🙂 It blows my mind how incredible all of your recipes are.

    Reply
    • brandi.doming@yahoo.com

      November 19, 2015 at 11:17 pm

      You are so, so kind, thank you so much Christina!! Glad to know you can have pecans, awesome! I use a Cuisinart, but also have a Kitchenaid. Both are excellent food processors, but the Cuisinart is higher quality and I like it better, so if you can drop a few extra dollars, get that one. I have the 11 cup one I think! Can’t wait to hear about the cookies!!

      Reply
  4. Andie @ micibakes

    November 19, 2015 at 5:58 pm

    looks amazing Brandi!

    Reply
    • brandi.doming@yahoo.com

      November 20, 2015 at 10:20 pm

      Thank you so very much Andie!!

      Reply
  5. Bianca @ ElephantasticVegan

    November 19, 2015 at 6:01 pm

    These apple hand pies look adorable! They are like a fancier (and finger food friendly version) of apple pies 😀 I love the step-by-by photos, they are beautiful and really help understanding the process better. Using pecan butter in the crust is simply genius. I’m a huge fan of your recipes! 🙂

    Reply
    • brandi.doming@yahoo.com

      November 20, 2015 at 12:11 am

      Bianca, thank you so very much for the compliments, you are the sweetest! I’m so glad you enjoyed the tutorial photos! I’m getting such a great response today from this post, I’m thinking I’ll try to do the step-by-step photos more often, it’s VERY time-consuming though, lol! But for more detailed recipes like this, I’ll try to do it. Thank you again for leaving such a nice comment!

      Reply
  6. Vivian

    November 19, 2015 at 6:30 pm

    Hi Brandi, you are so inspirational, I will definitely try these over Christmas as my daughter is celiac and vegan. They look delicious, thank you.

    Reply
    • brandi.doming@yahoo.com

      November 20, 2015 at 10:20 pm

      That is so kind of you Vivian! Thank you so much and please come back and let me know what you think! Enjoy!

      Reply
  7. Lisa

    November 19, 2015 at 9:16 pm

    These look so good! I am continually amazed at the magic that you create in your kitchen and keeping it to 8 ingredients, as well, is just well amazing!!

    Reply
    • brandi.doming@yahoo.com

      November 20, 2015 at 12:09 am

      Lisa, thank you so so much! I always enjoy your comments, you are always so generous and I really appreciate it! It isn’t always easy to create them at 8 ingredients, taste has to be #1! But, it’s my blog premise and I will only post what works and I am lazy and don’t like long ingredient recipes! This one surpassed my expectations! 🙂

      Reply
  8. Rebecca @ Strength and Sunshine

    November 19, 2015 at 9:48 pm

    O Brandi! pecan butter is one of my favorite nut butters to make at home! It’s so good! Pecans have such a distinct taste! Love these little fun pies 😉

    Reply
    • brandi.doming@yahoo.com

      November 19, 2015 at 11:54 pm

      It’s the BEST EVER!

      Reply
  9. Nissrine @ Harmony a la Carte

    November 19, 2015 at 10:06 pm

    These hand pies look incredible. I once made a galette/rustic roll out pie crust using hazelnut butter and it worked beautifully in place of butter or oil. But it was a gluten based flour. I love that you made this work gluten free, as usual, and they look amazing.

    Reply
    • brandi.doming@yahoo.com

      November 19, 2015 at 11:58 pm

      Thank you so much Nissrine, so kind of you! Oh, I love hazelnut butter too and have a chocolate chip cookie recipe here on the blog that the base is hazelnut butter…makes them super chewy! This pie crust though was crucial to pecan butter because of how light and oily pecans naturally are. It made the difference for sure in the crust.
      The end product seriously is just like a gluten pie crust, holds together perfectly, firm and doesn’t crumble or fall apart, amazing with no gums or egg replacers….all those trials were worth it, lol! I now have a good roll-able gluten-free pie crust in my pocket!

      Reply
  10. Jenn

    November 19, 2015 at 10:34 pm

    These look incredible, Brandi! Great job on that crust! I’m actually attempting to makeover my mom’s amazing toffee bar recipe and was planning to test pecan butter in the crust. Glad to know it worked so well here! 🙂 Totally different kind of crust, but still. My hubby absolutely loves apple pie. I don’t think I have the patience to cut the dough into little circles, so perhaps I will just attempt to make a big pie out of this!

    Reply
    • brandi.doming@yahoo.com

      November 19, 2015 at 11:15 pm

      Thank you so much Jenn! It was the magic for sure instead of oil, just like with my cookies 3 years ago. Haha, yeah, I’m normally too lazy for these types of recipes, but being the holidays, I’m ok with a little extra prep and since the dough can be made the day ahead, the actual pie making session comes together fairly fast and it is SO WORTH IT! The hand pies are just totally different than eating a slice of pie….like a hot pocket, lol!

      Reply
  11. Anna

    November 19, 2015 at 11:48 pm

    Thank you so much for putting the time into explaining how you got this recipe to turn out!! I enjoyed reading every sentence. Absolutely amazing, I envy your job, cannot wait to test this for myself on thanksgiving. Best clean blog ever

    Reply
    • brandi.doming@yahoo.com

      November 20, 2015 at 12:08 am

      Wow Anna, thank you so much for your kind words! And thank you for reading every sentence! I know it’s a long post, but I also know that people don’t make pies everyday and I wanted to make it easy and share every little detail in the process (with photos) and I’m so passionate about sharing my kitchen experiences. It means so much to me that you enjoyed reading it. I was worried people would skim over it but many have said they enjoyed reading, so maybe I should make all my posts extra long, haha! Thank you again for leaving your comment 🙂

      Reply
    • brandi.doming@yahoo.com

      November 20, 2015 at 4:07 am

      Oh and please come back and leave feedback after you make them, can’t wait to hear!

      Reply
  12. janet @ the taste space

    November 20, 2015 at 12:57 am

    Love it, Brandi! Smart minds think alike? I shared an some hand pie today as well but yours are much prettier. I am so curious about your dough. It sounds so different, but that is what makes your recipes so awesome!

    Reply
    • brandi.doming@yahoo.com

      November 20, 2015 at 4:07 am

      Ha, no way! I need to check yours out! Aww thank you so much! Definitely different type of crust, but it worked so amazing!

      Reply
  13. Natalie | Feasting on Fruit

    November 20, 2015 at 1:21 am

    After seeing your teaser crust pic on IG yesterday i was so intrigued by what you were making with those cookie like-circles that weren’t cookies, and late last night it hit me: little pies!! They look so adorable on the outside and so mouthwatering on the inside it’s perfect! That flour duo of tapioca and white rice sounds like it has some serious sticky power, but I love how it makes for such a cohesive smooth crust. And the homemade pecan butter is such a great fat source, I bet these are crazy good! And props to you for taking the time to do all these detailed step-by-step photos, they look fantastic <3

    Reply
    • brandi.doming@yahoo.com

      November 20, 2015 at 4:06 am

      Thank you so much Natalie! Yes, it has major sticky power, it’s really just like gluten pie dough, which is what I wanted. It bakes up so similar to a wheat crust! Thank you so much, so glad you like the photos!

      Reply
  14. Audrey @ Uncovnentional Baker

    November 20, 2015 at 5:20 am

    Hehe. I spied the pecan butter in these in your sneak peek photo last night 🙂 Lovely pies. I love hand pies and agree that a good gf & oil-free crust is hard to make. They look delicious! Love the apple-filling too. I have a hand pie recipe in queue for sharing too, but not till a special occasion ;).

    Reply
    • brandi.doming@yahoo.com

      November 20, 2015 at 6:02 am

      Thank you Audrey! Haha, wait I’m confused, what do you mean you spied the pecan butter, it wasn’t in the photo?? Yes, it was so hard and challenging and even though I’ve never seen a pie crust with pecan butter, I knew it would work, based on my successes of using it in my previous baking recipes! That and the 2 ingredient flour combo all came together for such a buttery/crispy crust, just like a wheat/gluten crust. I was doing a happy dance, lol!

      Reply
  15. Mandy

    November 20, 2015 at 8:03 am

    Brandi, you are seriously a master magician when it comes to the kitchen…just, WOW! I LOVE the detailed, step-by-step photos – it felt like I was in the kitchen with you, walking through the process. So helpful! I’m totally shocked at the crust! And those apples all cooked up in the pan look amazing. I can see why your hubby devoured them super fast…I would, too!

    Reply
    • Brandi

      November 24, 2015 at 11:51 am

      Awww Mandy, you are so incredibly kind!! Thank you so much for the compliments my friend! So glad you love these photos! These were so delicious and are now one of my favorite recipes!

      Reply
  16. Amie

    November 20, 2015 at 10:56 pm

    Looks so delicious! If you’re not a pie lover, would the crust make a good biscuit or cookie?…..

    Reply
    • brandi.doming@yahoo.com

      November 20, 2015 at 11:54 pm

      Hi Amie! They could be, with a couple of changes. The dough gets rather crispy, so I would follow the directions as is, but increase the sugar amount by a few tablespoons because it’s not nearly sweet enough for cookies. I would also not roll the dough out too thin, but instead, maybe closer to a 1/2 inch. You could then cut out your shapes and roll them in sugar. You could even add chocolate chips to the dough before you chill it. I’d probably bake them just about 10 mins so they don’t get too crispy. Just experiment with it. I am working on a sugar cookie recipe for Christmas for another reader request, so stay tuned for that too. 🙂

      Reply
  17. Michele @ Two Raspberries

    November 21, 2015 at 4:38 am

    oh my gosh! these are the cutest! and I love the crust so this way it’s even more crust! (compared to a traditional pie it always seems scipmy on the crust!) lol 😉 DE-LISH!

    Reply
  18. estee

    November 21, 2015 at 6:43 pm

    5 stars
    I made these pies today. They are absolutely magnificent. A couple of things. #1. I did roll out the dough a little bigger because I was afraid to go too small. This resulted in less pies but they still turned out so wonderful. #2. Make sure you measure the apples by weight. I used a smaller apple but the amount turned out fine for me because I had less pies with the thicker crust. This crust tastes exactly like a butter crust and is flaky and delicate. Absolutely devine. Rave reviews by all including my 14 year old son who pretty much shoved the whole pie in his mouth. Thank you again Brandi for this fabulous recipe.

    Reply
    • brandi.doming@yahoo.com

      November 21, 2015 at 7:25 pm

      Yay!! Thank you so much for such wonderful feedback Estee and thank YOU for submitting your recipe request! I’m so happy you and your son loved them so much! Great suggestions on the dough and measurements too, yes too thick of dough will result in less pies, so make sure to measure 1/8 inch. I still had leftover dough this way, using the 2.75 inch cookie cutter. So glad they were such a hit! Thank you for leaving feedback!
      I also loved your beautiful photos your shared on Facebook!

      Reply
  19. Brittany

    November 21, 2015 at 7:35 pm

    You had me at “hand.” I prefer food I can eat with my hands, and this fits the bill. YUM!

    Reply
  20. GiGi Eats Celebrities

    November 21, 2015 at 8:23 pm

    You do realize that if I could eat pies… The large 12 inch diameter pies would be considered… Hand pies to me too, right? LOL!

    Reply
  21. Fran

    November 21, 2015 at 11:19 pm

    5 stars
    I made these today and they are fantastic! I found cling wrap on top helped w/the rolling. The crust has a nice nutty taste & the texture is delicate, almost cookie like. They are truly amazing & do hold up in your hand bite by bite!

    Reply
    • Brandi

      November 24, 2015 at 11:53 am

      Wonderful Fran!! I’m so very happy to hear you loved these and they were such a hit! Thank you so much for the wonderful feedback!!

      Reply
  22. Holly

    November 22, 2015 at 3:55 am

    My student made these pies and said the dough was a dream to work with, unlike regular GF dough. I was wondering if you think this crust would work for a 9-inch pumpkin pie. Pumpkin pies usually have to cook for at least 50 minutes, and at a very high temperature (425, if I remember correctly) for the first 15 minutes. Do you think this crust could stand up to that much intense oven time?

    Reply
    • brandi.doming@yahoo.com

      November 22, 2015 at 8:44 pm

      Hi Holly! I’m so happy to hear that! I find it so amazing that this truly does work better than gluten-free dough as well, and I loved the taste better 🙂
      I have not tried it yet as a full pie, but I do know that it makes plenty for a 9 inch pie. Since this dough cooks in about 15 minutes, I would definitely suggest that letting it cook for the first 15 minutes uncovered and then covering the edges of the crust for the remainder of cooking so it doesn’t burn. That is my guess without testing it. Please let me know if you try it!

      Reply
      • Holly

        November 25, 2015 at 5:54 am

        Thanks so much! I will let you know what happens!

        Reply
  23. Sophia @Veggies Don't Bite

    November 22, 2015 at 8:12 am

    I love pecans just about as much as you do! I have them in both my pumpkin pie and another recipe coming soon. They are just the best little nut ever! I bet they make these little pies to die for!

    Reply
    • Brandi doming

      November 22, 2015 at 8:57 pm

      Yeah, well I’m sure you can tell by all the numerous recipes on my blog that I’m a huge pecan addict, lol! Yes, they were magical combined with the flours I chose that made this like the best rollable pie dough ever!

      Reply
      • Sophia @Veggies Don't Bite

        November 23, 2015 at 8:40 pm

        You can roll me in that dough any day 😉

        Reply
  24. Emanuela, The Raw Beet

    November 23, 2015 at 5:38 pm

    Hello Brandi,

    I don’t know if you remember me…I’m Emanuela and I used to have the food blog “On the Falvor Road”. I am the one who made the vegan pancakes without bananas for you <3!

    I moved back to Italy and I started studying Holistic Nutrition and I started a new food blog. All my recipes are whole foods plant based now! No meat, fish, eggs or cheese anymore! I feel great now!

    Your pies are just amazing! And the pecans butter secret is great! I'll keep it in mind.
    And I'll try to make your pies for sure!

    Thank you so much for sharing your recipes!
    I wish you all the best!

    Emanuela

    Reply
    • Brandi

      November 24, 2015 at 11:55 am

      Yes, hi Emanuela!! So great to hear from you! Thank you so much! I’ll need to check out your blog! Hope you are well!

      Reply
      • Emanuela, The Raw Beet

        November 24, 2015 at 4:17 pm

        I am very well thanks :)!
        Let me know what you think about it, if you have the cajole to check it out 🙂

        Have a nice day!
        Emanuela

        Reply
  25. Melinda Amato

    November 23, 2015 at 8:34 pm

    5 stars
    Incredible!! I was dreaming of finding a healthy, delicious, non-boring apple pie recipe and this was just perfect! I doubled the crust recipe to have both a top and bottom crust and I used four and a half golden delicious apples. I love knowing that every recipe you make is going to taste amazing 🙂 Thank you for this one!

    Reply
    • Brandi

      November 24, 2015 at 11:56 am

      Wow, thank you so much Melinda for the awesome feedback! You made my day! I’m so glad you made these, I know we were discussing on Facebook you making them and I’m so happy to hear you loved these so much! Thank you!

      Reply
  26. samantha

    November 25, 2015 at 5:46 am

    Hi!

    I am currently making these and I am at the step where I added the flours and pecan butter together in the food processor with the water and the vaanilla. My dough looks a bit dry. I know you wrote that we may be tempted to add flour to our dough but mine looks like it needs water! Do you have any suggestions? Mine does not look like your picture..it looks more crumbly. Please let me know! Thanks

    Samantha

    Reply
    • brandi.doming@yahoo.com

      November 25, 2015 at 5:54 am

      Hi, did you add the 6 tablespoons of hot water yet?? It looks really dry until you add that and then it comes together perfectly and should look like thick, stiff peanut butter after that. As long as you used accurate weight measurements, it should work out perfectly! I’ve made them many times.

      Reply
    • brandi.doming@yahoo.com

      November 25, 2015 at 5:58 am

      If you measured the tapioca and rice flour accurately and then dded the 1/2 cup pecan butter, 6 T hot water and vanilla, it’s impossible for it to be dry, as it gets VERY sticky and doughy, it should not be crumbly at all. The hot water solves that. If yours is crumbly, then my only guess is you got too much flour in there or not enough of the pecan butter (1/2 cup) and the water. Also, was your pecan butter super soft and creamy and runny like an oil?? If it was too thick/stiff, then that will affect the dough coming together too. It should be very very smooth.

      Reply
  27. Amanda

    November 26, 2015 at 2:28 pm

    These are just divine and yes the pastry is amazing! Next time I make them and this will be any day now:) I will make the top pastry slightly larger than the bottom to accommodate for the “lump of apples” and so I can get a nice fork edge like yours in the picture. Thank you for wonderful and delicious recipes. Happy Thanks giving to you and all your followers.

    Reply
    • brandi.doming@yahoo.com

      November 26, 2015 at 9:34 pm

      Thank you so much Amanda! I’m so happy you loved these so much!! I used about a 3inch cookie cutter which was just perfect to cover the tops easily, just have to make sure you aren’t adding too much filling (about a tbsp), but you can use a larger size too if you want! Thanks for the wonderful feedback!

      Reply
  28. Silvana

    November 27, 2015 at 8:26 pm

    5 stars
    I made this for Thanksgiving and they all loved them! They are absolutely delicious! Thanks Brandi!

    Reply
    • brandi.doming@yahoo.com

      November 27, 2015 at 9:38 pm

      Thank you so much Silvana, I’m so happy to hear that!!

      Reply
  29. Harriet Emily

    December 22, 2015 at 5:05 pm

    5 stars
    Love love love this recipe Brandi!!! I used your pastry to make some mince pies this week (I bought some mince pie filling from Meridian to fill them), and the pastry was so crisp and buttery. The pies were great and perfect for the holidays. I can’t wait to make some more!!! 😀 Thank you for sharing such a fabulous recipe! <3

    Reply
    • brandi.doming@yahoo.com

      December 22, 2015 at 5:12 pm

      Thank you so very much Harriet for making these beautiful mince pies! I absolutely loved your photos on Instagram and I’m so happy you loved them so much!

      Reply
  30. Tonette Joyce

    January 21, 2016 at 6:55 am

    5 stars
    These look wonderful!

    Reply
  31. April

    August 17, 2016 at 9:49 pm

    5 stars
    Seriously, when a home nearby opens up for sale, I WANT TO MOVE CLOSE TO YOU! JUST in the off chance you need the occasional tester!

    You are making my transition to vegan SO much easier and tastier. Thank you.

    Reply
    • brandi.doming@yahoo.com

      August 18, 2016 at 5:51 am

      Hi April! Hahahaha, so funny! I will gladly take test testers when I write a cookbook! I’m so happy to hear my recipes are helping your transition, that is why I blog, to help others! SO, thank you for the feedback!

      Reply
  32. Jane

    September 10, 2016 at 5:06 pm

    These look amazing! Do you think I could make them with regular wheat flour? Would the combined amounts of tapioca and rice flour be the amount to use of regular flour? We don’t have any gluten issues here and we live in Costa Rica and can’t get tapioca flour. Thank you!

    Reply
    • brandi.doming@yahoo.com

      September 10, 2016 at 6:34 pm

      Hi Jane! Honestly, I have only tested it with the above flours, so I can’t say what the exact results would be. You can certainly try it and let me know how it turns out. The tapioca does help a lot with it browning and becoming crispy, so not sure how it will be without it. But yes, I would try just subbing both the flours for all wheat and see. It will leave a wheat taste though, so keep that in mind. Let me know if you try it!

      Reply
  33. Ambra

    September 16, 2016 at 11:02 am

    Brandi! These photos are absolutely incredible!!! I love seeing those gorgeous shots of the preparation…. What a great post!!!

    Reply
    • brandi.doming@yahoo.com

      September 27, 2016 at 12:24 am

      Aww thank you so much Ambra, you are way too sweet!! So glad you love the photos!

      Reply
  34. Jennilee

    September 30, 2016 at 4:38 am

    The recipe says it makes 1 hand pie. How large are the hand pies?

    Reply
    • brandi.doming@yahoo.com

      September 30, 2016 at 5:29 pm

      Oops, that is fixed now. It makes 10 hand pies about 3 inches wide, I have each step notated very detailed about size and everything so it should be very helpful!

      Reply
  35. Anna

    July 18, 2017 at 12:31 pm

    I made this recipe on a whim and it was completely worth it! I did take a risk a substitute Spelt flour for the white rice flour (it was what I had on hand) and, while I can’t compare it to the intended recipe, the dough exceeded my expectations! They were absolutely delicious and I was extremely impressed with how they actually could be held in your hand to eat. The crust held up beautifully. They even passed the test with my husband (who ended up taking 5 of them in to work the next day to share with his office…sad day for my belly). Definitely a recipe I will be repeating in the future!

    Reply
    • brandi.doming@yahoo.com

      July 18, 2017 at 8:03 pm

      Awesome Anna! I’m so happy you loved these, thank you so much for the review!

      Reply
  36. Penny

    December 9, 2017 at 1:05 am

    5 stars
    I can’t believe how delicious these are, especially since they’re gluten & oil free! The crust is magic–thanks for another amazing recipe! <3

    Reply
    • brandi.doming@yahoo.com

      December 10, 2017 at 5:17 pm

      That is so awesome to hear Penny, thank you so much for the amazing review!

      Reply
  37. Elle

    October 20, 2018 at 12:21 am

    5 stars
    I just made these today and they are amazing! I didn’t have white rice flour so I used brown rice flour, and I think maybe because of that my dough was a little more delicate, but these still turned out fantastic. Thank you Brandi!

    Reply
    • brandi.doming@yahoo.com

      October 20, 2018 at 1:05 am

      So happy to hear that Elle, thank you so much for the amazing review! Yes, brown rice flour will make things much more crumbly.

      Reply
  38. Karina

    November 30, 2018 at 2:16 am

    Is there any way I can make this not gluten free? Maybe with spelt flour or whole wheat? Looks delicious!

    Reply
    • brandi.doming@yahoo.com

      December 5, 2018 at 11:24 pm

      Hi Karina, I’m so sorry I’m just now seeing this. I have only ever tested it with the above written flours, so I honestly can’t tell you how much regular flour to use or how it would work. It would probably be easier to find an already written regular pie crust on the internet since there are so many, so you don’t take a chance on getting it wrong here. I am hoping to post a regular wheat pie crust soon though.

      Reply
  39. RENE

    October 30, 2019 at 4:03 pm

    Looks really good but this is just way too much work. I would never have time to do something like this.

    Reply
    • brandi.doming@yahoo.com

      October 30, 2019 at 4:51 pm

      Yes. This is not an everyday recipe like 90% of the recipes on my blog. But a special occasion recipe designed for the holidays for people who love to get their baking on! It’s not for everybody for sure. But my readers who’ve made it so far have loved and appreciated the non-traditional Oil-free pie recipe!

      Reply
  40. Julie

    October 30, 2019 at 5:27 pm

    I can’t believe your timing with this!! I was actually thinking of asking you for a GF apple tart recipe that I could make for my daughter! You and Estee read my mind. My (adult) daughter was diagnosed this year with some food allergy issues. She had to cut out gluten and also rice. I’m going to give this a go and see how her system handles it, even with the white rice flour. Yay Brandi! Thanks for your creativity!

    Reply
    • brandi.doming@yahoo.com

      October 31, 2019 at 9:34 pm

      Thank you kindly Julie for being so sweet and appreciative for this recipe! I really hope it’s a hit with you all!!

      Reply
  41. Colleen

    November 10, 2019 at 10:12 pm

    5 stars
    Just made these for the first time and they are wonderful. The crust is terrific — best gluten free crust I’ve ever made — and the filling is delicious. Just one question — have you (or anyone else) ever tried making the pies, then freezing them unbaked so you can simply defrost and bake when you’re ready to serve them?

    Reply
    • brandi.doming@yahoo.com

      November 11, 2019 at 5:01 am

      Yay, really thrilled to hear that Colleen! Thank you so much for making them! I’ve actually never tried that personally freezing, no, but I imagine it would work. I would give it a shot!

      Reply
  42. Diana

    August 7, 2020 at 1:44 am

    5 stars
    Love your recipes
    I am wondering about just leaving out the sugar to make savory veggie handpies
    Would you think adding more flour would still work?
    Thank you

    Reply
    • brandi.doming@yahoo.com

      August 7, 2020 at 5:05 am

      Hi, I’ve never tried that, but you can certainly try it! I would not add more flour, it would make the dough dry. Leaving out the sugar shouldn’t make much of a difference.

      Reply
      • Diana

        November 12, 2020 at 12:41 am

        5 stars
        Thank you
        Love your recipes

        Reply
  43. Tanya

    October 26, 2020 at 12:42 am

    Brandi, these are adorable! I would feel so pastry-chef-y if I make these! I have a Breville Food Processor and it has a large plastic bowl with a large S blade, and a smaller bowl with a smaller S blade, so I can make smaller portions. Since we only need ½ cup of pecan butter, how much of the raw pecans do you think I would need to make that amount? I was trying not to have lots of pecan butter leftover and pecans are kinda pricey. Thank you 🙂 !!!

    Reply
    • brandi.doming@yahoo.com

      October 26, 2020 at 1:38 am

      Hi Tanya! Thank you! I would guess a full cup? You need at least that probably anyways in order to get it to actually have enough to blend up into a butter. Usually a cup of nuts makes about half a cup of nut butter.

      Reply
      • Tanya

        October 28, 2020 at 10:52 pm

        Thank you 🙂 !!! Hugs for being so wonderful…I really appreciate your help!

        Reply

Primary Sidebar

Search this blog…


I'm Brandi, creator of this vegan blog and cookbook author of The Vegan 8 Cookbook. The majority of my recipes focus on 8 ingredients or less, not counting salt, pepper or water. I love to create health-focused recipes, using whole foods to improve fitness and muscle-building, with the occasional comfort meal thrown in there! I'm an expert on oil-free cooking and baking! read more →

ORDER NOW!!

Join 414,119 Followers!

FacebookInstagramPinteresttumblr

The Vegan 8 is a participant in the Amazon Services LLC Associates Program, an affiliate advertising program designed to provide a means for sites to earn advertising fees by advertising and linking to amazon.com. As an Amazon associate I earn from qualifying purchases. Please see my full disclosure policy here.

MOST POPULAR POSTS!

WHAT’S IN MY VEGAN PANTRY

THE BEST VEGAN FLUFFY PANCAKES

Fluffy vegan pancakes stacked on plate

THE BEST VEGAN ALFREDO SAUCE

Best Vegan Garlic Alfredo on white plate

THE BEST VEGAN QUESO

Hand dipping chip into bowl of vegan queso

VEGAN STUFFED RICOTTA SHELLS

Vegan Stuffed Shells with Spinach

VEGAN THAI GREEN CURRY

Bowl of vegan thai green sweet potato curry

CHEESY MEXICAN TORTILLA BAKE

Vegan Cheesy Mexican Tortilla Bake in casserole dish

CLASSIC VEGAN NOODLE SOUP

Classic Vegan Noodle Soup in turquoise bowl

THE BEST VEGAN RANCH DRESSING

Best Vegan Ranch Dressing pouring over a salad

THE BEST OATMEAL CHOCOLATE CHIP COOKIES

Vegan Gluten-free Oatmeal Chocolate Chip Cookies stacked

THE BEST VEGAN FUNFETTI CAKE

Slice of Vegan Gluten-free Funfetti Birthday Cake

THE BEST VEGAN SNICKERDOODLES

Vegan Gluten-free Snickerdoodles stacked on plate

BEST VEGAN GLUTEN-FREE CHOCOLATE CHIP COOKIES

scattered vegan chocolate chip cookies on white board

Recent Posts

  • Vegan Creamy BBQ Chickpeas and Lentils
  • Best Vegan Carrot Cake (Oil-free!)
  • Vegan Snickerdoodle Cookie Protein Bites
  • Vegan Chocolate Protein Pancakes
  • The Best Smoky Tofu
  • Easy Vegan Nutella (5 Minutes!)
  • Homemade Vegan Ramen Seasoning (Bonus Soup Recipe)
  • The Best Vegan Pancakes EVER
  • Vegan Jackfruit Pinto Bean Chili
  • Vegan Thanksgiving Recipes (Gluten-free Options!)

Copyright The Vegan 8 © 2022 · Privacy Policy

  • 117
  • 2.1K