• Skip to primary navigation
  • Skip to main content
  • Skip to primary sidebar

The Vegan 8

  • About
  • Recipe Index
  • My Cookbooks
    • The Vegan 8 Cookbook
    • 8 Ingredient Desserts Ebook
You are here: Home / Dessert / Cookies/Bars / Vegan Butterfinger Candy Bars

Vegan Butterfinger Candy Bars

14.5Kshares
  • Share
  • Tweet
  • Pin
Jump to Recipe Print Recipe

Healthy Vegan Butterfinger Candy Bars with just 6 ingredients, dairy-free, oil-free and incredibly delicious! Made with whole foods and mulberries!

Vegan butterfinger candy bars on white paper

VEGAN BUTTERFINGER CANDY BARS

I’m just going to put this out there….this might just be the most amazing recipe I have ever been able to come up with in my kitchen…..especially considering the ease and ingredient list! I took my favorite candy bar of all time that is filled with this:

WHAT IS BUTTERFINGER CANDY MADE OUT OF?

Corn Syrup, Sugar, Peanuts, Hydrogenated Palm Kernel Oil, Cocoa, Molasses, Whey, Confectioner’s Corn Flakes, Nonfat Milk, Salt, Lactic Acid Esters, Soy Lecithin, Soybean Oil, Cornstarch, Artificial Flavors, Tbhq And Citric Acid, Yellow 5, Red 40

Pretty darn gross.

Vegan butterfinger candy bars on white platter

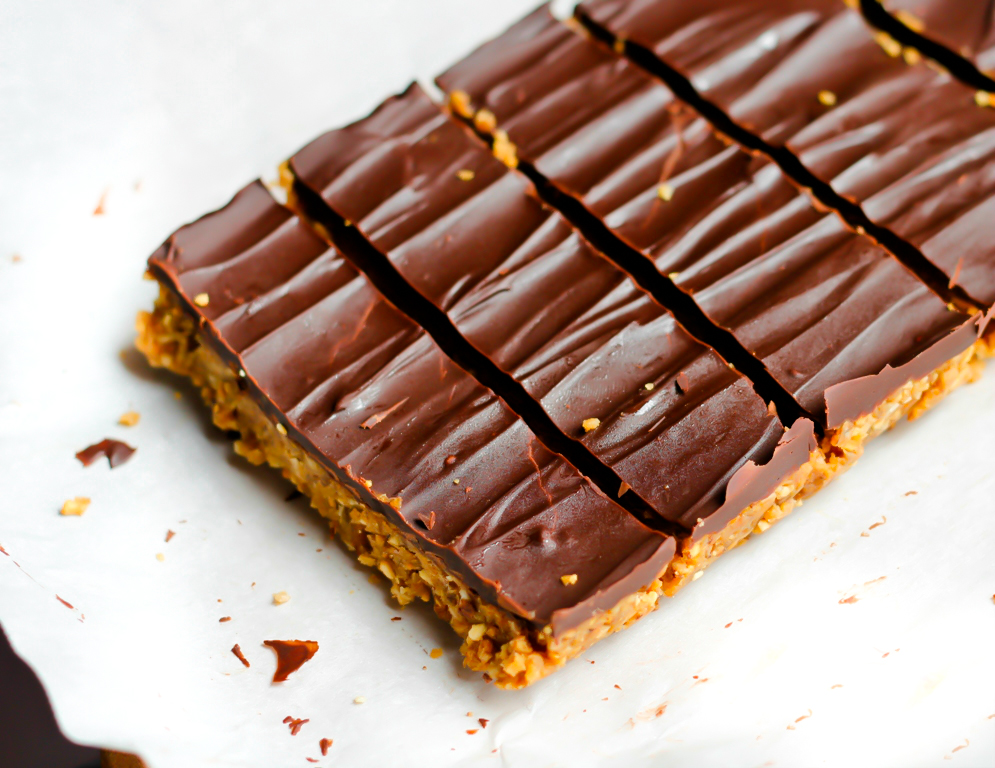
Well, now you can have Vegan Butterfinger Candy Bars that taste just as amazing and they are actually healthy butterfingers!

Butterfinger was my favorite candy bar growing up. What I loved about it was the sweet, chewy, crunchiness that is covered in chocolate. And who doesn’t love the combo of peanut butter and chocolate? These taste rich, sweet and amazing. Honestly, that is why I didn’t want to coat the entire thing in chocolate…it would be overkill. These are seriously sweet enough, as is. But if you want them covered in chocolate, knock yourself out!

I have seen a few vegan butterfinger recipes on the internet…but they all use corn syrup, molasses, sugar and/or cornflakes. That’s fine of course, but not what I was after and none of those are raw.

HOW I CAME UP WITH THIS RECIPE

I thought…..”how in the world can I create that sticky, sweet and crunch factor without cornflakes and without molasses??”

I was lying in bed one night racking my brain….like I do quite often with recipes…..and some how the stars aligned and this just popped in my head….“wait, dried white mulberries are chewy, slightly crunchy and amazingly, naturally sweet!!” Seriously, the first time I tried them I was blown away by how sweet they are….they taste just like a chewy ball of honey. Tip: I keep mine in the fridge and they become crunchy….even better. They are a superfood fruit that is incredibly good for you!

mulberries falling out of a bag

Would mulberries really work?? So, the next day I threw some dried mulberries and some peanuts in my food processor and whirled it about a minute until it was a sticky, crumbly texture. I tried it and whoa, the flavor tasted just like a butterfinger

My hubby and I both just were kind of stunned at the authenticity of the flavor. Each one I ate, I just kept saying…wow, I’m eating a butterfinger without the guilt!

HOW TO MAKE VEGAN BUTTERFINGER CANDY BARS

You won’t believe the secret ingredient I used to be able to create these healthy butterfinger candy bars. No scary candy making involved, no thermometers, no cornflakes or awful ingredients.

First, you will need the very magical ingredient: mulberries!

Bag of raw mulberries

I order my mulberries from Rawguru, but you can also order them here from Amazon and they are super cheap! I’ve also seen them at my local HEB and Whole Foods, so for those wanting to make this asap today, run to the store!

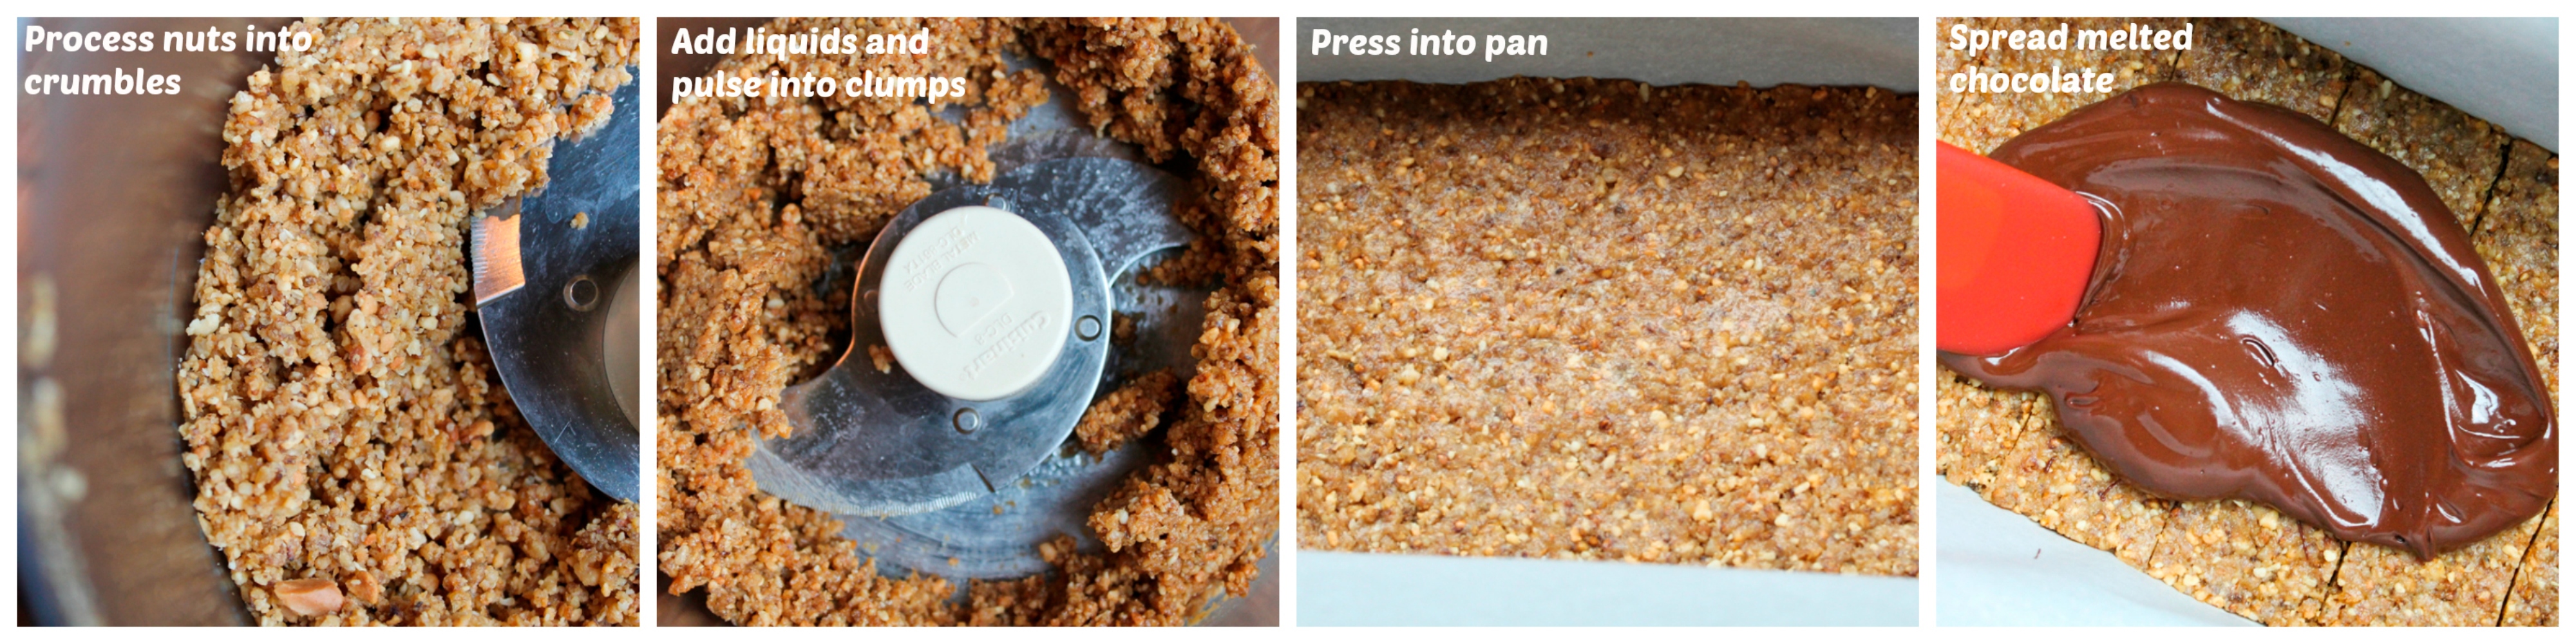
Next, you will simply add the peanuts to a food processor and pulse into crumbles.

Add the liquids and pulse into sticky clumps.

Add the batter to a lined loaf pan and press down hard and flat.

Melt the chocolate, spread it on top of the butterfinger mixture and freeze until firm! These process photos will help.

process shots of vegan butterfinger candy bar batter in processor

I honestly still can’t get over that this idea worked and that I can totally eat a “butterfinger” without the awful ingredients or guilt. I hope you all love these Vegan Butterfinger Candy Bars!

Stack of vegan butterfinger candy bars

5 from 9 votes
Print

Vegan Butterfinger Candy Bars

Healthy Vegan Butterfinger Candy Bars with just 6 ingredients, dairy-free, oil-free and incredibly delicious! Made with whole foods and mulberries!
Course Dessert
Cuisine American
Keyword dairy-free butterfinger, healthy butterfinger bars, homemade butterfinger candy bars recipe, vegan butterfinger candy bars
Prep Time 15 minutes
Cook Time 0 minutes
Total Time 15 minutes
Servings 7 bars
Author Brandi Doming

Ingredients

  • 1 1/2 heaping cups (180g) mulberries dried, not fresh!

  • 3/4 cup (120g) roasted peanuts
  • 1/8 teaspoon fine salt
  • 2 tablespoons (40g) raw agave nectar
  • 1/2 teaspoon vanilla extract

Chocolate Coating

  • You can choose any 1 of the 3 options below for this:
  • 1. Melt 5 oz of your favorite chocolate bar (5 oz is about 1 1/2 regular size bars (3.5 oz size bars)
  • 2. OR Melt 3/4 cup chocolate chips
  • 3. OR Make your own chocolate using the following ingredients below:
  • 1/2 cup (120g) melted liquid cocoa butter
  • 1/2 cup (48g) raw cacao powder
  • 3-4 tablespoons (60-80g) agave or preferred liquid sweetener

Note

  • Keep your mulberries stored in the fridge for extra crunch. Following the exact weight measurements will ensure the right texture result. Agave or coconut nectar works best for the batter. I wouldn't use maple syrup, since it's not quite as thick or sticky. Make sure to store these in the freezer, as they will have more of a crunch and hold together best.

Instructions

  1. Line a 9X5 loaf pan (make sure it isn't a 10X5 as that will make the bars skinny and fragile) with parchment paper hanging over the sides, for easy removal later.
  2. Add the mulberries, peanuts and salt to a food processor and pulse until a crumbly flour forms. You don't want it into a paste, just a crumbly texture (see pic). Add the agave and vanilla. Pulse a few times until sticky large clumps form, being careful not to create "butter". If the dough is not holding as clumps when pressed with your fingers, add a touch more agave. It needs to be forming clumps, as this is what will make the bars hold together.
  3. Pour out the dough onto the prepared pan and spread out, flat and even, working your way around to the corners. Overlap the parchment paper and press down really hard and evenly. Place in the fridge for 30 minutes to harden.
  4. Gently melt the chocolate to your preferred method and spread over the top of the dough evenly and quickly since the cold bars will start to harden the chocolate. Place back in the fridge to harden the chocolate for about 15 minutes. Remove and very carefully, with a fine sharp knife, cut into 7 bars while they are still in the pan, as they will retain their shape better this way. If they are too hard to cut, let them thaw 5 minutes. Don't leave them at room temperature long though, as they will soften too much. Place in the freezer this time to harden for an hour, then you can remove them from the pan and wrap them individually in plastic wrap, if you desire. Keep them stored in the freezer, and they will retain their crunch that way. They become more firm overnight. You could also keep them in the fridge, but they will be less crunchy.

Recipe Notes

Nutrition info is based on the homemade chocolate coating using the cocoa butter. If you use chocolate chips or a chocolate bar, adjust accordingly. For the homemade chocolate, you can totally get away with halving the recipe (1/4 cup) if you want to save on fat/calories. A 1/4 cup will give a thin chocolate layer, but if you want a thick layer, do the 1/2 cup. I preferred the 1/2 cup layer, but provided nutrition for both.

*For 1/2 cup of the chocolate coating, nutrition per bar: 306 calories, 24.38 g fat, 20.6 carbs, 5.66 g protein

*For 1/4 cup of the chocolate coating, nutrition per bar: 198.6 calories, 16 g fat, 11.72 carbs, 4.98 g protein


Filed Under: Chocolate, Cookies/Bars, Gluten Free, No Bake Tagged With: agave, Butterfinger, candy bars, chocolate, dessert, Gluten-free, mulberries, Peanuts

Previous Post: « Chunky Potato & Zucchini Soup
Next Post: Vegan Almond Joy Milkshake »

Reader Interactions

Comments

  1. Judy Moody

    April 11, 2015 at 5:09 am

    Made these last night by far the best treat ever , better than any candy bar Ive had in 50 years! You are a genius everything I make that is a recipe from you is the bomb!

    Reply
    • brandi.doming@yahoo.com

      April 11, 2015 at 5:56 pm

      Wow! That is so awesome to hear Judy, thank you so much for such awesome feedback!!

      Reply
  2. Kathleen

    July 6, 2015 at 11:47 am

    Thank you for another great recipe! I made these over the weekend and they were a hit! The only problem: they are addictive!! A nice treat though 🙂

    Reply
    • brandi.doming@yahoo.com

      July 6, 2015 at 2:59 pm

      I’m so glad they were a hit, thank you so much for the wonderful feedback! I agree, one of my most addictive recipes even for myself!

      Reply
  3. April

    September 3, 2015 at 4:41 am

    I am in love with the idea of these and being able to make such a pretty candy bar at home! I finally got the chance last night. Parchment paper is not something I keep around, but I was able to use a old ziploc bag cut at the seams as the liner for my pan and it worked perfectly.

    I was skeptical about the raw peanuts because the taste of them kind of remind me of raw beans or garbanzo flour, but wanted to give the recipe a try as written. They are good as is, the mulberries do a good job masking the strange raw flavor of the peanuts, but for me the true butterfinger taste would need roasted peanuts, so next time I make them it will be with roasted peanuts. I am glad I have tried them this way though. Thank you for the awesome recipe, the mulberries are such a great idea!

    Reply
    • brandi.doming@yahoo.com

      September 4, 2015 at 10:39 am

      Hi April! You know, truth be told, I always use roasted peanuts as well because the flavor is soooo much better, but I listed raw peanuts because that was my original tested version and it is what makes it truly raw, but roasted is sooo delicious! Definitely try it with roasted and don’t forget the salt….it is crucial to that butterfinger flavor 🙂

      Reply
  4. Courtney Caldwell

    October 31, 2015 at 11:07 pm

    You’ve outdone yourself again, Brandi. These are yummy! And you’re right about the freezer time . . . these tasty treats are better the longer they sit in the cold box.

    @April, will have to try the roasted peanuts in the next batch.

    Thanks for making our Halloween 2015 such a (guilt-free) treat! 😀

    Reply
    • brandi.doming@yahoo.com

      November 1, 2015 at 12:11 am

      I’m ecstatic you loved these so much Courtney! Thank you so much for making them and leaving feedback! Yes, cold they are best and keep their shape best that way too! 🙂

      Reply
  5. Lana

    November 4, 2015 at 10:02 pm

    Brandi, I just made these and they are to die for! Absolutely to die for! They are so easy to make, but super tasty and amazing. Thank you for another great recipe!

    Reply
    • brandi.doming@yahoo.com

      November 5, 2015 at 5:53 am

      Thank you so much Lana! I’m so, so happy you loved these so much! Thank you very much for leaving feedback, much appreciated and I love your pic you posted on IG!

      Reply
  6. Courtney Caldwell

    November 8, 2015 at 3:38 am

    It’s only been a wk and already I’ve had to remake this recipe. (Darn the price of mulberries!) 🙂 This time I tried @April’s note and opted for roasted peanuts v the raw ones. SO DELIC! The raw batch was good, but the roasted really bring out the original butterfinger flavor.

    Q: what is it about the roasted peanuts that doesn’t make them raw?

    Thanks again for the recipe!
    C

    Reply
    • brandi.doming@yahoo.com

      November 8, 2015 at 8:12 pm

      Thank you so much Courtney for the wonderful feedback! So glad you love these! I agree, they are best with roasted peanuts, the only reason I put the raw ones on there is because in order to classify this as a raw recipe, unroasted must be used, but to be honest, I always make these now with roasted. The peanuts are not raw if they are roasted, simply because they are cooked, which makes them not raw. They are heated at too high of a temperature to be considered raw, which is past 118 degrees I believe.

      Reply
  7. Once upon a thyme

    January 27, 2016 at 10:41 am

    5 stars
    This recipe is absolutely amazing! So easy to make, simple and natural ingredients, and the result makes it so hard to believe that it’s a healthy snack! A big thumbs up, thank you very much for sharing

    Reply
    • brandi.doming@yahoo.com

      February 28, 2016 at 9:24 am

      Thank you so very much, I’m so happy to hear you loved these, thank you for the feedback!

      Reply
  8. Diana

    February 18, 2016 at 1:24 am

    5 stars
    Brandi, you’re a genius! These are fantastic! It took me forever to finally make this but now I’m hooked! Butterfingers was always my favorite candy but I haven’t had one in years. Now I can make these anytime and satify my sweet tooth with something MUCH healthier! These were so easy to make and as always, your directions were crystal clear. THANK YOU!

    Reply
    • brandi.doming@yahoo.com

      February 28, 2016 at 9:24 am

      Awww thank you so much Diana, for the amazing feedback, I’m ecstatic you loved these so much! They were always my #1 favorite candy bar growing up as well and it’s amazing how healthy these are, yet taste so REAL! Thank you again!

      Reply
  9. alexandra

    February 18, 2016 at 1:52 am

    5 stars
    Excellent; well done.

    Reply
    • brandi.doming@yahoo.com

      February 28, 2016 at 9:25 am

      Thank you so much!

      Reply
  10. Casey Linke

    May 15, 2016 at 8:07 pm

    5 stars
    Made these last night AND THEY ARE SO GOOD! I want to eat the ENTIRE PAN… seriously.. i think you must be magical. How did you even come UP with this?!!!???!!! THANK YOU for bringing these bars into my life! I am going to make every single one of your recipes. 🙂

    Reply
    • brandi.doming@yahoo.com

      May 16, 2016 at 2:49 am

      Aww thank you so much Casey! So happy you loved them! I literally thought of the idea of using mulberries while lying in bed one night racking my brain trying to think of something with a sticky chewy honey-ish flavor…I didn’t want to use cornsyrup so I wondered if blending up mulberries would work and to my amazement, it did! Haha! I don’t think I’ve ever been so excited about a recipe before or more proud, as this one, because it’s so different yet tastes so authentic! Thank you for the feedback!

      Reply
  11. John

    June 2, 2016 at 7:55 am

    5 stars
    If I ever hit the Powerball, I want you to be my personal chef! This is the 5th recipe of yours I have made, and is the best one so far. Which is a pretty high standard, considering the others were fantastic. Even my wife is slowly coming around to considering becoming vegan.

    Never even heard of white mulberries before. So stinking good! We make the ice cream on Friday. Really looking forward to that (if the butterfingers last that long)

    Reply
    • brandi.doming@yahoo.com

      June 2, 2016 at 8:49 pm

      Awww such a lovely comment and compliment John, thank you so much for this wonderful feedback, you really made my day! So glad to hear you are loving the recipes!

      Reply
  12. Elizabeth

    September 27, 2016 at 1:59 am

    Wow, these really do taste like Butterfingers! So simple, so brilliant. Nomnomnom. I will say the ones I made didn’t hold together, but they tasted just right so I didn’t want to add more agave.

    Thanks for sharing your brilliant creation 🙂

    Reply
  13. Becky

    April 5, 2017 at 6:53 am

    I made these tonight for my guy’s birthday and they were fantastic! We didn’t really think they tasted like a Butterfinger, but then I at some of the crumbs left over from cutting them into bars, and without the dark chocolate they DO taste like a Butterfinger! Maybe it’s because Butterfingers had milk chocolate, or maybe it’s because mine had a way thicker chocolate coating on top than yours did, but regardless…..we all loved them! And I’m digging those dried white mulberries! I put them on my smoothie bowl and they get crunchy because they get cold. Love it! Thanks!

    Reply
    • brandi.doming@yahoo.com

      April 5, 2017 at 9:00 am

      Yay! So glad you loved these Becky! Thanks so much for the review! Yes, I wouldn’t say they are a 100% dead ringer for the classic candy bar, because let’s face it, it is made from entirely different ingredients and the bars are not fully coated in chocolate. However, like you said, the peanut mixture does taste like a Butterfinger and it certainly meant to be a much healthier but familiar taste of a Butterfinger. 🙂

      Reply
  14. Steve Kehoe

    April 26, 2017 at 11:13 pm

    5 stars
    These butterfingers are unbelievable! Made them for our Healthy Eating monthly potluck and they were a HUGE hit. You nailed it with the dried mulberries. I roasted raw peanuts and put them in food processor fresh from the oven, I think that really put them over the top! Making again for a potluck tonight but don’t have any peanuts some I’m going to roast some cashews. We’ll see how it comes out. Tried quite a few of your recipes and loved everyone! Your site is on the “online site reference sheet” we pass out at our potlucks and at our church. Yours site has a big star by it! 🙂

    Reply
    • brandi.doming@yahoo.com

      April 29, 2017 at 7:59 pm

      Thank you so much Steve! That is so wonderful to hear, thank you so very much for leaving this awesome review!

      Reply
  15. CToth

    August 5, 2018 at 11:35 pm

    5 stars
    WOW!!! Seriously delicious!! I love the mouth feel, it really is like eating a candy bar. Best of all… no guilt. So much gratitude for your creativity and sharing. Thank you!!!!
    😋 Yummy
    Oh, and I added 1 tbsp of peanut butter – just wanted a little more peanuty goodness.

    Reply
    • brandi.doming@yahoo.com

      August 6, 2018 at 12:18 am

      Yay Celeste!! So happy you loved them so much! Thank you for the lovely review!!

      Reply
  16. Dori K

    December 28, 2018 at 10:03 pm

    5 stars
    OHMYDOG!!OHMYDOG!!OHMYDOG!! Just found this recipe – my ABSOLUTE FAVORITE candy bar IN THE ENTIRE WORLD. I have found my soul sister! I am making your black bean dip and hummus for a New Year’s Eve party and then stumbled on this. I am beyond excited about being able to eat a healthy butterfinger. Thank you! Thank you! Thank you! I’ve got your cookbook on order with Amazon and can’t wait to receive it. You have such a gift for this – thank you for sharing it with the world. 3> 3> 3>

    Reply
    • brandi.doming@yahoo.com

      December 28, 2018 at 10:11 pm

      Oh yay Dori, so glad you are excited about these! I hope you love them!! Happy early New Year’s Eve! Thank you so much for ordering my book too! Yay!

      Reply
« Older Comments

Leave a Reply Cancel reply

Your email address will not be published. Required fields are marked *

This site uses Akismet to reduce spam. Learn how your comment data is processed.

Primary Sidebar

Search this blog…


I'm Brandi, creator of this vegan blog who healed my husband's gout through a plant-based diet. I create delicious vegan comfort food in a healthier way! All my recipes are 8 ingredients or less, not counting salt, pepper or water. I'm an expert on oil-free cooking! I will teach you all my tricks. read more →

ORDER NOW!!

Join 305,200 Followers!

FacebookInstagramPinteresttumblr

CLICK HERE FOR THE VEGAN 8 MEAL PLAN!

MOST POPULAR RECIPES!

THE BEST VEGAN FLUFFY PANCAKES

Fluffy vegan pancakes stacked on plate

THE BEST VEGAN ALFREDO SAUCE

Best Vegan Garlic Alfredo on white plate

THE BEST VEGAN QUESO

Hand dipping chip into bowl of vegan queso

VEGAN STUFFED RICOTTA SHELLS

Vegan Stuffed Shells with Spinach

VEGAN THAI GREEN CURRY

Bowl of vegan thai green sweet potato curry

CHEESY MEXICAN TORTILLA BAKE

Vegan Cheesy Mexican Tortilla Bake in casserole dish

CLASSIC VEGAN NOODLE SOUP

Classic Vegan Noodle Soup in turquoise bowl

THE BEST VEGAN RANCH DRESSING

Best Vegan Ranch Dressing pouring over a salad

THE BEST OATMEAL CHOCOLATE CHIP COOKIES

Vegan Gluten-free Oatmeal Chocolate Chip Cookies stacked

THE BEST VEGAN FUNFETTI CAKE

Slice of Vegan Gluten-free Funfetti Birthday Cake

THE BEST VEGAN SNICKERDOODLES

Vegan Gluten-free Snickerdoodles stacked on plate

BEST VEGAN GLUTEN-FREE CHOCOLATE CHIP COOKIES

scattered vegan chocolate chip cookies on white board

Recent Posts

  • Texas BBQ Sauce (No ketchup!)
  • Vegan Pecan Pie Bars (Gluten-free and No-Bake!)
  • Vegan Berry Breakfast Cake
  • Vegan Christmas Cookies
  • Vegan Chocolate Cream Pie (No Tofu!)
  • Gluten Free Vegan Pie Crust (Oil-free!)
  • Best Vegan Pumpkin Pie Recipe
  • Vegan Dark Chocolate Truffles
  • Vegan Pumpkin Cream Cheese
  • The Best Thai Peanut Sauce

Copyright The Vegan 8 © 2019 · Privacy Policy

  • 1.1K
  • 13.4K