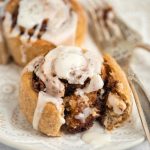
Healthy Vegan Cinnamon Rolls (No Butter!)
These amazing Healthy Vegan Cinnamon Rolls and Cream Cheese Glaze are out of this world! They are made in a very unique way from the typical butter recipes out there, as these have no butter and no oil and are absolutely just as delicious! They are super easy to make and only require 1 rise!
Servings: 10 rolls
Calories: 293kcal
Ingredients
DOUGH
- 3 cups (384g) regular all-purpose flour (please no subs for the recipe to work best)
- one 1/4 oz packet (2 1/4 teaspoon) instant yeast (make sure your yeast is new and not old, or they won't rise)
- 3/4 teaspoon fine salt (this amount is crucial so the dough is balanced and not bland, as there is little sweetener used inside the dough and this uses a lot of flour. I tested with less and it tasted bland.)
- 1 cup (240g) canned lite coconut milk (not full-fat!), room temperature! (can shaken first)
- 1/4 cup (60g) cooked, peeled, mashed yukon gold potato
- 3 tablespoons (60g) pure maple syrup
- 1/4 cup (64g) roasted walnut butter (follow instructions here)
- 1 1/2 teaspoons vanilla extract (optional)
FILLING
- 1/2 cup coconut sugar
- 1 1/2 tablespoons ground cinnamon
- 1/4 cup (64g) roasted walnut butter
CREAM CHEESE ICING
- 1 cup (128g) powdered sugar (sifted if lumpy)
- 2 tablespoons (30g) non-dairy unsweetened yogurt (I use the So Delicious plain coconut)
- 1/2 teaspoon fresh lemon juice
NOTE
- For a recipe like this to require such precision, I recommend using a scale. It will make the process much easier and less room for error. You will only need a scale and bowls, no measuring cups to compare. Follow the grams and you are good to go. Make sure to zero out before adding each ingredient.
- I use this scale.
Instructions
- Follow the photo steps in the post to help guide you. I've explained everything in great detail. First, you will need to make the walnut butter. You can make this the day before if you like to get a jump start. It takes all of 20 minutes from start to finish. Once that is done, making the rolls are incredibly easy.
- To a very large, deep tall bowl (if possible), add the flour, instant yeast and salt. Whisk well.
- Cook a medium yukon gold potato with the skin on wrapped in a damp paper towel in the microwave until squishy soft. 3-5 minutes. If you don't want to use a microwave, bake it, but this will obviously add much more time. Do not boil or steam it, as this will add too much moisture to the potato and affect the dough. Peel the skin off the potato, mash well with a fork and weigh 60 grams in a separate medium bowl (not the bowl with the flour) Set aside.
- To the same bowl with the potato, weigh the milk, maple syrup, vanilla (if using) and ONLY 1/4 cup (64g) walnut butter (you'll use another 1/4 cup for the flling). Transfer this mixture to a food processor. Process for a couple of minutes until 100% smooth and no bits or chunks of potato remain. You want to make sure it's totally a smooth liquid.
- Pour the liquid (scrape the processor out well) over the dry ingredients. Use a large silicone or rubber spoon, this will be easier than using a metal one. Stir for a few minutes until it comes together into a rough, shaggy looking dough (pictured above). This means it is not smooth or fully mixed. It will seem dry at first, but don't be tempted to add more milk! Mixing by hand (as opposed to an electric dough hook) will take longer. Stir until about 90% of it is combined.
- Flour a work surface lightly and scrape the dough out. Knead the dough for just a couple of minutes, rotating, pressing and flipping over the dough until it comes together into a smooth round ball. This should be fairly quick, as mixing with your hands at this point is much easier than a spoon. Do not over mix the dough, you just want it smooth and combined. Overworking the dough can make for tough rolls. It should not be sticking to your hands, but be easy to work with.
- Rinse out the large bowl you just used and wipe it dry. Add the ball of dough back to the bowl. Cover with plastic wrap (sprayed with nonstick spray if it's a short or shallow bowl, otherwise the dough will stick) and seal it around the edges. Alternatively, if you have a really tall bowl like I used, and don't like to use plastic, use a slightly damp towel to cover the bowl. I prefer the plastic wrap method, as it really traps the air and moisture to help the yeast work.
- Turn on the oven light, but don't turn the oven on! Place the bowl in the oven and let it rise 45 minutes to an hour, or until it looks to have about doubled in size. Mine took around an hour and a few minutes. Please keep in mind, judge this rise by the look, not the time, as each environment and climate will affect how quickly it rises.
- Remove the bowl from the oven once it's ready and scrape the dough back onto the lightly floured work surface. It'll be a comforting warm temperature. Use a rolling pin to gently roll out into a rectangular shape of about 10 1/2 inches wide by 16 inches long. It should be about 1/4 inch thick. Should only take a minute.
- At this time, preheat the oven to 350°F (177°C) and line a pan with parchment paper.
- Use a pastry or silicone brush to lightly brush on some coconut milk in a thin layer. This is important so that the cinnamon sugar mixture adheres well and doesn't create open gaps while baking. It also makes the interior moist where butter would normally be used!
- In a small bowl, combine the cinnamon, coconut sugar and ONLY the 1/4 cup (64g) remaining walnut butter. Mix and press together with the back of a spoon or fork until it resembles a moist, crumbly consistency. Sprinkle this all over the dough evenly, leaving about a 1/2 inch boarder along the edges.
- Start with the long end and gently and tightly roll it into a log. You will need to trim off the ends as these are mostly dough without the filling. About 1-2 inches worth. Use a very sharp knife or serrated knife to gently cut into rolls, 1 1/2 inches thick (if rolled out correct) yielded 10 perfect size rolls. The dough will be soft, but they do slice fairly easily. I used a really sharp smooth knife and preferred this over serrated. You will need to hold each roll with one
hand as you slice down, doing a gentle sawing motion. In between each slice, pat your knife with a little extra flour. This will help slicing, as the knife gets sticky with the filling. - Carefully pick up each roll and lay it (filling side up) onto the pan spaced at least 2 inches apart. I fit 8 on the first pan. Bake them for 18-20 minutes or until looking golden brown. Mine were perfect at 19 minutes, but ovens can vary.
- Add the icing ingredients to a bowl and stir until it is moistened. It will seem too dry, but will come together. Whisk rapidly until completely smooth and sugar is dissolved. After the rolls have come out of the oven, let them sit 5-10 minutes before icing them. Add a spoonful of icing on the center of each roll and spread around to let it drizzle down the sides. Serve while warm! See notes if you would like to bake them in a dish close together.
- Store extra rolls tightly covered at room temperature so they don't dry out. I like to reheat them the next day in the microwave for about 15 seconds. Makes them taste just as fresh!
Notes
- Baking them separately on a pan as I've done will yield a more firm, almost crispy exterior to the rolls. I much prefer them this way, which is not really traditional in most recipes out there. I like the look better and I like to just pick up the roll with my hand and eat it, you don’t even need a fork!
- But, if you prefer softer edges, then place them in a 9×13 casserole dish or two 9 inch round cake pans lined with parchment paper (cut to fit neatly). Make sure to space them a bit apart as well so they can expand and fluff up properly. This method will take longer to bake, more like 25 minutes, but ovens vary. Look for them to be golden brown.
- PREP AHEAD: To save time if you have guests coming, you can do all of the work the night before! Follow the steps all the way until after you’ve sliced the log into the rolls (step 13). Place them in a casserole dish or something large so they don’t get squished. Cover with a tight lid or plastic wrap and place in the fridge. The next day, take them out at least an hour before you will want to bake them to give yourself time. Let the dough come back to room temperature before baking, otherwise they will not bake up or fluff up well during baking. You will notice the dough start to expand a bit as it comes to room temperature.
- NUTRITION: Nutrition stats does not include the cream cheese glaze.
Nutrition
Serving: 1roll | Calories: 293kcal | Carbohydrates: 47.2g | Protein: 7.8g | Fat: 9.2g | Saturated Fat: 1.6g | Sodium: 149mg | Potassium: 167mg | Fiber: 2.8g | Sugar: 13.5g | Iron: 3mg