
Healthy Vegan Butterfinger Candy Bars with just 6 ingredients, dairy-free, oil-free and incredibly delicious! Made with whole foods and mulberries!
VEGAN BUTTERFINGER CANDY BARS
I’m just going to put this out there….this might just be the most amazing recipe I have ever been able to come up with in my kitchen…..especially considering the ease and ingredient list! I took my favorite candy bar of all time that is filled with this:
WHAT IS BUTTERFINGER CANDY MADE OUT OF?
Corn Syrup, Sugar, Peanuts, Hydrogenated Palm Kernel Oil, Cocoa, Molasses, Whey, Confectioner’s Corn Flakes, Nonfat Milk, Salt, Lactic Acid Esters, Soy Lecithin, Soybean Oil, Cornstarch, Artificial Flavors, Tbhq And Citric Acid, Yellow 5, Red 40
Pretty darn gross.

Well, now you can have Vegan Butterfinger Candy Bars that taste just as amazing and they are actually healthy butterfingers!
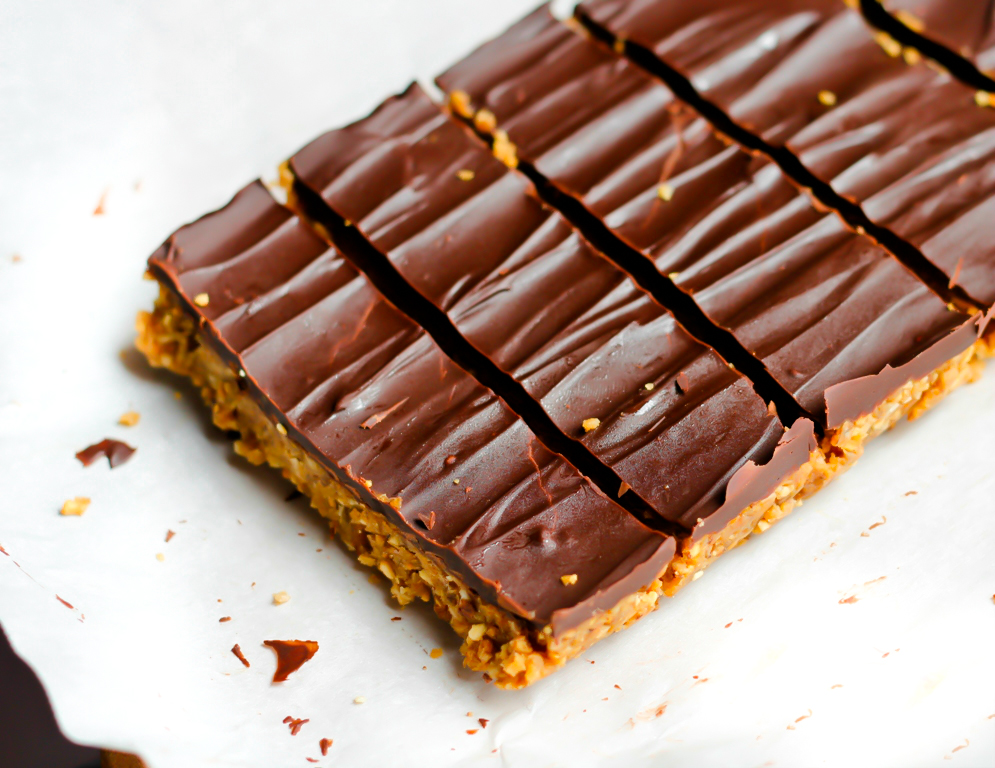
Butterfinger was my favorite candy bar growing up. What I loved about it was the sweet, chewy, crunchiness that is covered in chocolate. And who doesn’t love the combo of peanut butter and chocolate? These taste rich, sweet and amazing. Honestly, that is why I didn’t want to coat the entire thing in chocolate…it would be overkill. These are seriously sweet enough, as is. But if you want them covered in chocolate, knock yourself out!
I have seen a few vegan butterfinger recipes on the internet…but they all use corn syrup, molasses, sugar and/or cornflakes. That’s fine of course, but not what I was after and none of those are raw.
HOW I CAME UP WITH THIS RECIPE
I thought…..”how in the world can I create that sticky, sweet and crunch factor without cornflakes and without molasses??”
I was lying in bed one night racking my brain….like I do quite often with recipes…..and some how the stars aligned and this just popped in my head….“wait, dried white mulberries are chewy, slightly crunchy and amazingly, naturally sweet!!” Seriously, the first time I tried them I was blown away by how sweet they are….they taste just like a chewy ball of honey. Tip: I keep mine in the fridge and they become crunchy….even better. They are a superfood fruit that is incredibly good for you!

Would mulberries really work?? So, the next day I threw some dried mulberries and some peanuts in my food processor and whirled it about a minute until it was a sticky, crumbly texture. I tried it and whoa, the flavor tasted just like a butterfinger
My hubby and I both just were kind of stunned at the authenticity of the flavor. Each one I ate, I just kept saying…wow, I’m eating a butterfinger without the guilt!
HOW TO MAKE VEGAN BUTTERFINGER CANDY BARS
You won’t believe the secret ingredient I used to be able to create these healthy butterfinger candy bars. No scary candy making involved, no thermometers, no cornflakes or awful ingredients.
First, you will need the very magical ingredient: mulberries!

I order my mulberries from Rawguru, but you can also order them here from Amazon and they are super cheap! I’ve also seen them at my local HEB and Whole Foods, so for those wanting to make this asap today, run to the store!
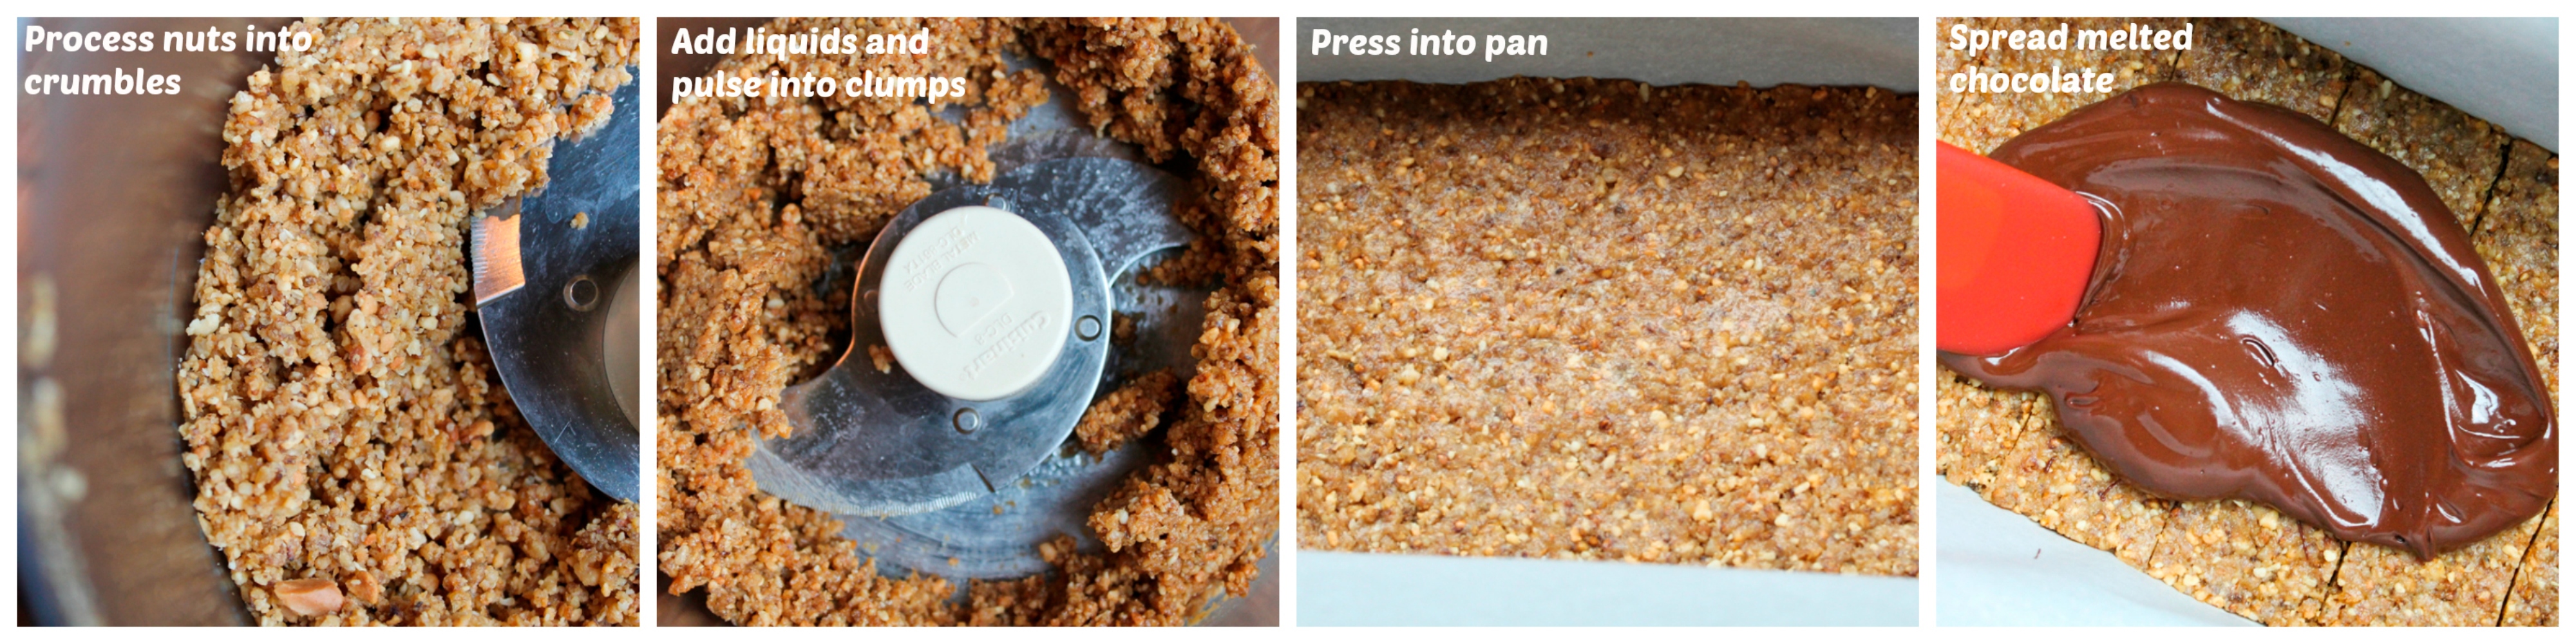
Next, you will simply add the peanuts to a food processor and pulse into crumbles.
Add the liquids and pulse into sticky clumps.
Add the batter to a lined loaf pan and press down hard and flat.
Melt the chocolate, spread it on top of the butterfinger mixture and freeze until firm! These process photos will help.
I honestly still can’t get over that this idea worked and that I can totally eat a “butterfinger” without the awful ingredients or guilt. I hope you all love these Vegan Butterfinger Candy Bars!


Healthy Vegan Butterfinger Candy Bars
Ingredients
- 1 1/2 heaping cups (180g) mulberries dried, not fresh!
- 3/4 cup (120g) roasted peanuts
- 1/4 teaspoon fine sea salt
- 2 tablespoons (40g) raw agave nectar
- 1/2 teaspoon vanilla extract
CHOCOLATE TOPPING: Choose any 1 of the 3 options
- Option 1: Melt 5 oz of your favorite chocolate bar (5 oz is about 1 1/2 regular size bars (3.5 oz size bars)
- Option 2: Melt 3/4 cup semi-sweet dairy-free chocolate chips
MAKE YOUR OWN
- 1/2 cup (120g) melted liquid cocoa butter
- 1/2 cup (48g) raw cacao powder
- 3-4 tablespoons (60-80g) agave or preferred liquid sweetener
Note
- Keep your mulberries stored in the fridge for extra crunch. Following the exact weight measurements will ensure the right texture result. Agave or coconut nectar works best for the batter. I wouldn't use maple syrup, since it's not quite as thick or sticky. Make sure to store these in the freezer, as they will have more of a crunch and hold together best.
Instructions
- Line a 9X5 loaf pan (make sure it isn't a 10X5 as that will make the bars skinny and fragile) with parchment paper hanging over the sides, for easy removal later.
- Add the mulberries, peanuts and salt to a food processor and pulse until a crumbly flour forms. You don't want it into a paste, just a fine crumbly texture (see pic). Add the agave and vanilla. Pulse several times until sticky large clumps form, being careful not to create "butter". If the batter is not holding as clumps when pressed with your fingers, add a touch more agave. It needs to be forming sticky clumps, as this is what will make the bars hold together.
- Add the batter to the prepared pan and spread out, flat and even, working your way around to the corners. Press down very hard and compact. Overlap the parchment paper and press down really hard and evenly. Place in the freezer for just 15 minutes to firm up a bit.
- Gently melt the chocolate to your preferred method and spread over the top of the dough evenly and quickly since the cold bars will start to harden the chocolate. Place back in the freezer for just a few minutes to harden the chocolate.
- Very carefully, lift up the bars and with a fine sharp knife, cut into 7 bars. If they are too hard to cut, let them thaw 5 minutes. Don't leave them at room temperature long though, as they will soften too much.
- Place them back in the freezer this time to harden for an hour, then you can remove them from the pan and wrap them individually in plastic wrap, if you desire. Keep them stored in the freezer and they will retain their crunch that way. They become more firm overnight. You could also keep them in the fridge, but they will be less crunchy.
Notes
Hi, Thank you for the great recipe. To me they remind me of a much yummier version of an atkins or slim fast bar (not that I eat those now 🙂 The crunchy bottom layer is very unique relative to the other vegan and or wfpb recipes out there. I wanted to point out that there seems to be a difference in types of dried mulberries. This was my first time buying and using mulberries. I bought sun dried and when I sampled one out of the bag I thought uh oh this isnt right because it was chewy similar to a raisin texture (ish) and so I began to worry and tried to research online if there was a type of dried that should be crunchy and not soft and chewy but couldnt find the answer then I saw your suggestion of what kind to buy at amazon were sun dried but still i doubted. So I attempted to dry them some more. I baked in a 170 degree oven for a couple hours and then I gave up and left them in the oven on a cookie sheet all night with oven off. In the morning they were crunchy! I was able to make the recipe and the bottom layer of the bar is somewhat crunchy instead of gooey and chewy which I think is the point. I felt I needed to share that info so others can be clued in as to which kind of dry mulberries to buy, I guess sun dried may not be the way to go since they are chewy, not crunchy.
WooHoo! Just made these today. I roasted almonds instead of peanuts, cuz can’t do peanuts. and followed recipe using the melt choc chips version. I cut into 6 pieces instead of 7, cuz it’s easier to figure out to cut in half, then each half in thirds. Cut one strip into quarters to “sample” before putting into freezer…because the aroma coming up from cutting them was just TOOO good! LOL. Super Delish AND rich!, so cut the remaining strips in half. They’re in the freezer now. Will try again tomorrow to test the “crunch” factor. Thank you Brandi for ez delicious recipe!
Could you use peanut butter instead of peanuts?
No because the texture is different once it’s already into a liquid peanut butter. Ground up peanuts are a crunchy loose texture.
Was wondering if any other sweetener. Could be used instead of the agave? I don’t really use it but I guess if I love these I would use it? How many batches do you get out of one bag? One, two? Thank you. I miss Butterfingers
Hi Susan, what do you mean bag? Do you mean a jar of agave? You could try maple syrup but it’s much less sticky and of course has a maple flavor, which is why I use agave since it helps the bars to hold better. As well as it’s a neutral sweet flavor. But you can try maple syrup if you like, keeping in mind the flavor and texture will change some.
These are incredible! I made them with date syrup instead of agave and they came out perfect! 10/10 recommend
OHMYDOG!!OHMYDOG!!OHMYDOG!! Just found this recipe – my ABSOLUTE FAVORITE candy bar IN THE ENTIRE WORLD. I have found my soul sister! I am making your black bean dip and hummus for a New Year’s Eve party and then stumbled on this. I am beyond excited about being able to eat a healthy butterfinger. Thank you! Thank you! Thank you! I’ve got your cookbook on order with Amazon and can’t wait to receive it. You have such a gift for this – thank you for sharing it with the world. 3> 3> 3>
Oh yay Dori, so glad you are excited about these! I hope you love them!! Happy early New Year’s Eve! Thank you so much for ordering my book too! Yay!
WOW!!! Seriously delicious!! I love the mouth feel, it really is like eating a candy bar. Best of all… no guilt. So much gratitude for your creativity and sharing. Thank you!!!!
😋 Yummy
Oh, and I added 1 tbsp of peanut butter – just wanted a little more peanuty goodness.
Yay Celeste!! So happy you loved them so much! Thank you for the lovely review!!
These butterfingers are unbelievable! Made them for our Healthy Eating monthly potluck and they were a HUGE hit. You nailed it with the dried mulberries. I roasted raw peanuts and put them in food processor fresh from the oven, I think that really put them over the top! Making again for a potluck tonight but don’t have any peanuts some I’m going to roast some cashews. We’ll see how it comes out. Tried quite a few of your recipes and loved everyone! Your site is on the “online site reference sheet” we pass out at our potlucks and at our church. Yours site has a big star by it! 🙂
Thank you so much Steve! That is so wonderful to hear, thank you so very much for leaving this awesome review!
I made these tonight for my guy’s birthday and they were fantastic! We didn’t really think they tasted like a Butterfinger, but then I at some of the crumbs left over from cutting them into bars, and without the dark chocolate they DO taste like a Butterfinger! Maybe it’s because Butterfingers had milk chocolate, or maybe it’s because mine had a way thicker chocolate coating on top than yours did, but regardless…..we all loved them! And I’m digging those dried white mulberries! I put them on my smoothie bowl and they get crunchy because they get cold. Love it! Thanks!
Yay! So glad you loved these Becky! Thanks so much for the review! Yes, I wouldn’t say they are a 100% dead ringer for the classic candy bar, because let’s face it, it is made from entirely different ingredients and the bars are not fully coated in chocolate. However, like you said, the peanut mixture does taste like a Butterfinger and it certainly meant to be a much healthier but familiar taste of a Butterfinger. 🙂
Wow, these really do taste like Butterfingers! So simple, so brilliant. Nomnomnom. I will say the ones I made didn’t hold together, but they tasted just right so I didn’t want to add more agave.
Thanks for sharing your brilliant creation 🙂
If I ever hit the Powerball, I want you to be my personal chef! This is the 5th recipe of yours I have made, and is the best one so far. Which is a pretty high standard, considering the others were fantastic. Even my wife is slowly coming around to considering becoming vegan.
Never even heard of white mulberries before. So stinking good! We make the ice cream on Friday. Really looking forward to that (if the butterfingers last that long)
Awww such a lovely comment and compliment John, thank you so much for this wonderful feedback, you really made my day! So glad to hear you are loving the recipes!
Made these last night AND THEY ARE SO GOOD! I want to eat the ENTIRE PAN… seriously.. i think you must be magical. How did you even come UP with this?!!!???!!! THANK YOU for bringing these bars into my life! I am going to make every single one of your recipes. 🙂
Aww thank you so much Casey! So happy you loved them! I literally thought of the idea of using mulberries while lying in bed one night racking my brain trying to think of something with a sticky chewy honey-ish flavor…I didn’t want to use cornsyrup so I wondered if blending up mulberries would work and to my amazement, it did! Haha! I don’t think I’ve ever been so excited about a recipe before or more proud, as this one, because it’s so different yet tastes so authentic! Thank you for the feedback!
Excellent; well done.
Thank you so much!
Brandi, you’re a genius! These are fantastic! It took me forever to finally make this but now I’m hooked! Butterfingers was always my favorite candy but I haven’t had one in years. Now I can make these anytime and satify my sweet tooth with something MUCH healthier! These were so easy to make and as always, your directions were crystal clear. THANK YOU!
Awww thank you so much Diana, for the amazing feedback, I’m ecstatic you loved these so much! They were always my #1 favorite candy bar growing up as well and it’s amazing how healthy these are, yet taste so REAL! Thank you again!
This recipe is absolutely amazing! So easy to make, simple and natural ingredients, and the result makes it so hard to believe that it’s a healthy snack! A big thumbs up, thank you very much for sharing
Thank you so very much, I’m so happy to hear you loved these, thank you for the feedback!
It’s only been a wk and already I’ve had to remake this recipe. (Darn the price of mulberries!) 🙂 This time I tried @April’s note and opted for roasted peanuts v the raw ones. SO DELIC! The raw batch was good, but the roasted really bring out the original butterfinger flavor.
Q: what is it about the roasted peanuts that doesn’t make them raw?
Thanks again for the recipe!
C
Thank you so much Courtney for the wonderful feedback! So glad you love these! I agree, they are best with roasted peanuts, the only reason I put the raw ones on there is because in order to classify this as a raw recipe, unroasted must be used, but to be honest, I always make these now with roasted. The peanuts are not raw if they are roasted, simply because they are cooked, which makes them not raw. They are heated at too high of a temperature to be considered raw, which is past 118 degrees I believe.
Brandi, I just made these and they are to die for! Absolutely to die for! They are so easy to make, but super tasty and amazing. Thank you for another great recipe!
Thank you so much Lana! I’m so, so happy you loved these so much! Thank you very much for leaving feedback, much appreciated and I love your pic you posted on IG!
You’ve outdone yourself again, Brandi. These are yummy! And you’re right about the freezer time . . . these tasty treats are better the longer they sit in the cold box.
@April, will have to try the roasted peanuts in the next batch.
Thanks for making our Halloween 2015 such a (guilt-free) treat! 😀
I’m ecstatic you loved these so much Courtney! Thank you so much for making them and leaving feedback! Yes, cold they are best and keep their shape best that way too! 🙂
I am in love with the idea of these and being able to make such a pretty candy bar at home! I finally got the chance last night. Parchment paper is not something I keep around, but I was able to use a old ziploc bag cut at the seams as the liner for my pan and it worked perfectly.
I was skeptical about the raw peanuts because the taste of them kind of remind me of raw beans or garbanzo flour, but wanted to give the recipe a try as written. They are good as is, the mulberries do a good job masking the strange raw flavor of the peanuts, but for me the true butterfinger taste would need roasted peanuts, so next time I make them it will be with roasted peanuts. I am glad I have tried them this way though. Thank you for the awesome recipe, the mulberries are such a great idea!
Hi April! You know, truth be told, I always use roasted peanuts as well because the flavor is soooo much better, but I listed raw peanuts because that was my original tested version and it is what makes it truly raw, but roasted is sooo delicious! Definitely try it with roasted and don’t forget the salt….it is crucial to that butterfinger flavor 🙂
Thank you for another great recipe! I made these over the weekend and they were a hit! The only problem: they are addictive!! A nice treat though 🙂
I’m so glad they were a hit, thank you so much for the wonderful feedback! I agree, one of my most addictive recipes even for myself!
Made these last night by far the best treat ever , better than any candy bar Ive had in 50 years! You are a genius everything I make that is a recipe from you is the bomb!
Wow! That is so awesome to hear Judy, thank you so much for such awesome feedback!!