
Learn how to make the best easy Vegan Gluten-free Sugar Cookies that are also oil-free, yet so buttery, sweet, soft and delicious! Just 8 ingredients!

VEGAN GLUTEN-FREE SUGAR COOKIES
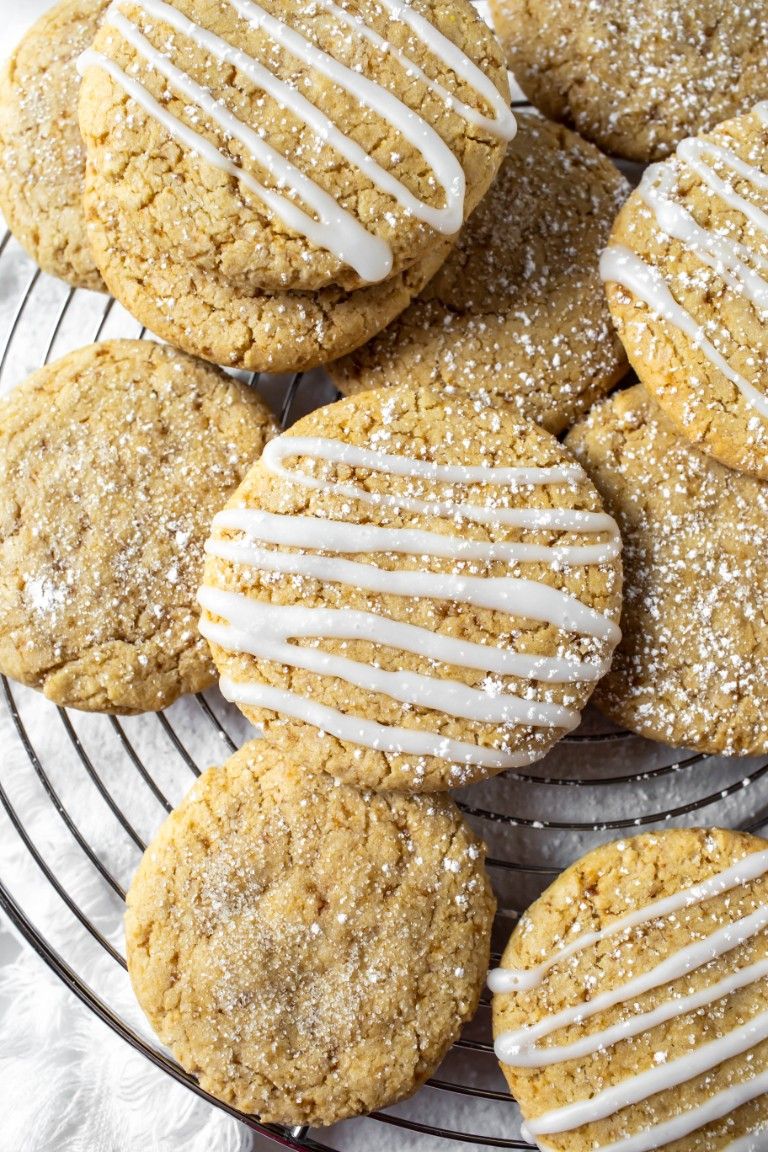
When a cookie is so good, it’s hard to believe there is no oil, butter or gluten in them! These are absolutely delicious vegan sugar cookies! Gluten-free and oil-free! They have slight crispy edges and soft, chewy centers.
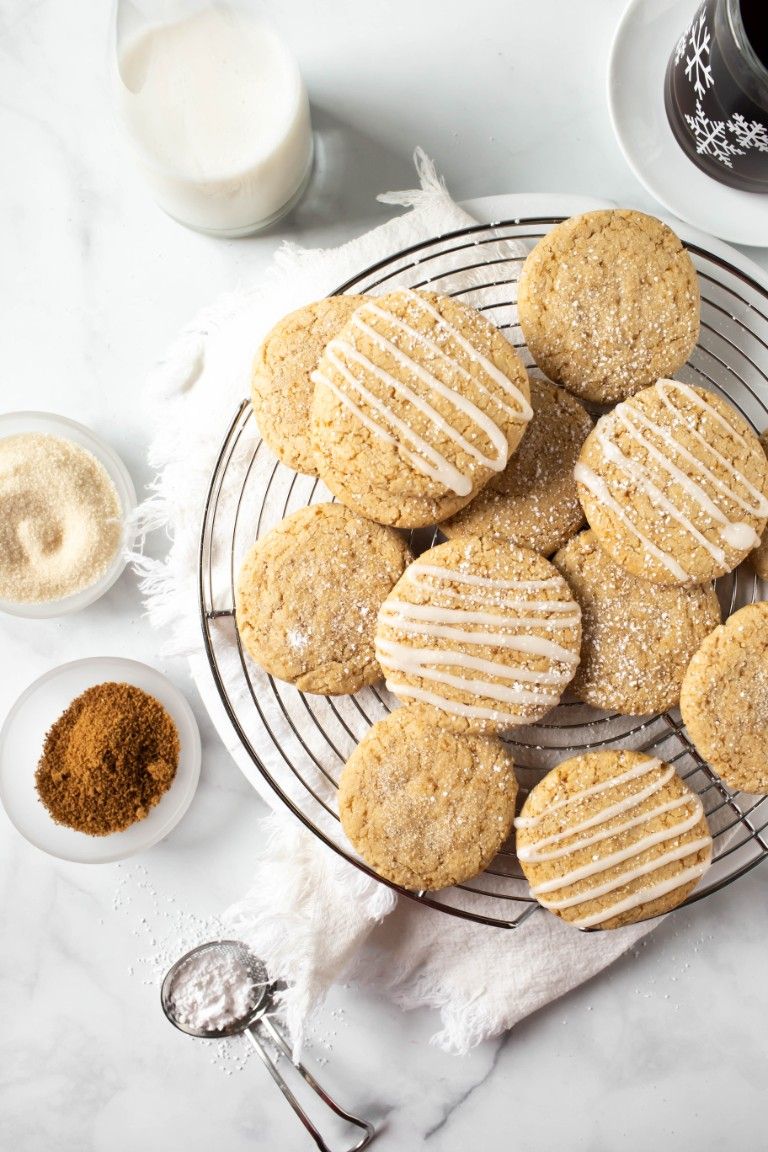
These cookies are delicious as is, but if you want a festive decoration, feel free to sprinkle raw sugar or sprinkling sugar on top and add a simple glaze on top after they bake.
INGREDIENTS NEEDED
First, you’ll need to gather these 8 ingredients (+salt):
- Coconut Sugar: You will powder this sugar first in a Vitamix or coffee grinder so that it is superfine. This will yield a better color and texture to the cookies. Otherwise, you can use regular white sugar if you like.
- Maple syrup
- Baking powder
- Vanilla
- Raw Cashew butter: It is crucial to use a raw cashew butter so the texture of these cookies turn out right. Since this can be hard to find in stores and quite expensive. I always make my own in my food processor.
- Blanched Almond Flour: This is where the cookies get the majority of moisture from and a nice chew to the cookie. I use either the “Superfine” Bob’s Red Mill Blanched Almond Flour, Honeyville Blanched Almond Flour or Nature’s Eats Almond Flour are all good.
- White Rice Flour: This adds a slight crispness to the exterior of the cookies and also helps to bind them.
- Potato Starch: This gives lightness and softness.

HOW TO MAKE VEGAN GLUTEN FREE SUGAR COOKIES
Step 1: Add the dry ingredients to a large bowl and whisk very well.

Step 2: Add the syrup, cashew butter and vanilla and stir until a thick, cohesive batter forms.

Step 3: Roll into 16 balls (heaping tablespoon each) and place on the 2 pans, spaced about 2 inches apart.

Step 4: Press down each ball down to 1/4 inch thickness, using a patting circular motion with your fingers and form into a round shape. Sprinkle raw or sparkling sugar on them before baking if desired.

Step 5: Bake for about 8-9 minutes until puffed up and golden, with a crackled effect. Do not overbake these. I found past 9 minutes made them dry out quickly. Cool completely before eating.

MORE VEGAN COOKIE RECIPES
- Vegan Peanut Butter Chocolate Chip Cookies
- Best Vegan Gluten-free Chocolate Chip Cookies
- Vegan Almond Butter Blossoms
- Vegan Snickerdoodles
- Vegan Old-Fashioned Iced Oatmeal Cookies
- Vegan Thin Mints
- Best Vegan Oatmeal Chocolate Chip Cookies
- Vegan Lemon Cookies
- Coconut Butter Gingersnaps

The Best Vegan Gluten-Free Sugar Cookies
Ingredients
- 4 tablespoons (40g) coconut sugar, powdered (see directions)
- 1 cup + 2 tablespoons (128g) superfine blanched almond flour
- 7 tablespoons (70g) potato starch (SEE NOTES below for sub) I order mine here and it's very cheap.
- 1/4 cup + 2 tablespoons (60g) white rice flour
- 3/4 teaspoon aluminum-free baking powder
- scant 1/2 teaspoon fine sea salt
- 6 tablespoons (120g) pure maple syrup OR agave
- 1/4 cup + 2 tablespoons (96g) raw cashew butter I make my own here
- 2 teaspoons (10g) vanilla extract
- Optional: organic sprinkling sugar for topping if desired.
NOTE
- Of course, as always, I recommend highly to use a scale to prevent room for error. You don't need cups or to compare the weights to cups, just simply follow the weights listed, as this is exactly how the recipes are tested and made. Make sure to zero out before adding each ingredient.
- I use this scale.
Instructions
- Preheat the oven to 350°F (177°C) and line 2 cookie sheets with parchment paper.
- First, you will need to blend up your coconut sugar down to a fine powder. I did this in my Vitamix in about 15 seconds. This gives better distribution of sweetness, and visual, to the cookies since coconut sugar granules are very gritty. It did not work in my food processor, so use a high-powered blender or coffee grinder.
- Add the ground up sugar, almond flour, potato starch, rice flour, baking powder and salt to a large bowl. Whisk very well.
- Make sure your cashew butter is very smooth and flowy and not stiff, or the cookies will be dry. Add the syrup, cashew butter and vanilla to the dry and stir until the batter comes together into a thick sticky ball (as pictured in post).
- Using a tablespoon, scoop out a heaping tablespoon of dough and roll into 16 balls and place on the 2 pans, spaced about 2 inches apart. Press down each ball down to 1/4 inch thickness, using a patting circular motion with your fingers and form into a round shape. See photo in post for how they should look. Sprinkle with sprinkling sugar, if desired.
- Bake for 8-9 minutes. Mine are perfect at 9 minutes in my humid/hot weather, but drier or cold weather, 8 minutes will probably be better. Going over 9 made mine too dry, but keep in mind ovens vary. They should have puffed up and be golden and a slight crackled effect.
- Cool for 10 minutes on the pan, as they will be too delicate to remove right away. Use a thin spatula to transfer to a cooling rack to finish cooling. They are too gooey immediately but will fluff out as they cool. These are best the first day and start to dry out by the next day, so make sure to store in a sealed container. If you want to decorate some with icing like I have in the photos, follow the "Classic Icing" from these oatmeal cookies and use only half of the recipe.
Notes
- POTATO STARCH: If you do not have or cannot find potato starch, then you can sub with cornstarch and it works just as well! The mouthfeel is slightly more starchy, but still delicious. You will use 70 grams (same weight amount) which is equivalent to 9 tablespoons. The tablespoon measurements are different than potato starch because they weigh differently, which is why you'll need 2 more tablespoons of cornstarch. For best results, I always recommend weighing for baking.
- CASHEW BUTTER: It is crucial to use a raw cashew butter (with no added oil/sugar) so the texture of these cookies turn out right. Since this can be hard to find in stores and quite expensive. I always make my own in my food processor.
- SUGAR: If you prefer, you can sub regular white granulated sugar for the coconut sugar (not powdered white sugar, just regular). I have not tested this personally, but it should work fine. Due to the difference in sweetness and flavor though, it will change some. Coconut sugar has more of a deep caramel flavor.
- ALMOND FLOUR: This is where the cookies get the majority of moisture from and a nice chew to the cookie. It replaces butter, so it cannot be subbed. I use either the "Superfine" Bob's Red Mill Blanched Almond Flour, "Superfine" Bob's Red Mill Blanched Almond Flour or "Superfine" Bob's Red Mill Blanched Almond Flour are all good.
- White Rice Flour: This adds a slight crispness to the exterior of the cookies and also helps to bind them.
Nutrition
The Vegan 8 is a participant in the Amazon Services LLC Associates Program, an affiliate advertising program designed to provide a means for sites to earn advertising fees by advertising and linking to amazon.com. As an Amazon associate I earn from qualifying purchases. Please see my full disclosure policy here.
Hi! Can I use this batter with a cookie press? Please say yes!
Hi Eva! I honestly have no idea because I’ve never used a cookie press, so I’m not sure of the type of dough requirements in order to use one. This dough is sticky, but is able to be rolled into balls. I guess you could always give it a shot and see!
Thanks! There’s no Earth Balance where I live, so I was looking for a recipe with oil. I’ll get back to you then!
I’m not one to comment on recipes unless they are worth it, and this one is most certainly worth it! SO GOOD! Thanks for all your trial and error. You really knocked it outta the park!
Thank you very much Ollie for taking the time to leave feedback, I just am so glad you loved these!
OMG! These just came out of the oven and the were delicious! I wanted to eat the whole pan! I’m so happy to have found this recipe.
Yay! So very happy to hear that Alicia! Thank you for the feedback!
I would love to try these!! Do you think they could be made with Bob Red Mill’s all purpose gluten-free flour in place of the white rice flour? I have almond flour, but not the white rice flour. Also, would it be best to combine both the almond and all purpose or just use all purpose? Would the potato starch be necessary if using all-purpose flour??
Hi Zakiya! I wouldn’t recommend subbing all of that because I tested this recipe multiple times and can only vouch for what is written above. Using a gluten-free blend could totally alter the texture, taste and liquid ratios and without testing it with Bob’s blend, I have no idea if it would work out or not. It would be better to just buy the rice flour so you don’t take a chance at ruining the recipe by trying Bob’s blend. Rice flour is one of the least expensive flours and I use it a lot in my recipes. I do know that Bob’s blend has gum in it and that alone can change the texture of the cookies. You definitely don’t want to omit the almond flour as that is crucial for the buttery moisture flavor and texture, since I don’t use any oil. If you were to try it, I would sub the GF blend for all of the rice flour and starch, but again, I have no idea how it would work successfully or not.
These cookies are great! Thanks to your recipes for sweet treats, my kids want me to only make the healthy treats. Yay! 🙂
Aww thank you so much Eva! Wow, such a compliment! Thank you for the feedback and I loved your pic on Facebook, they looked just perfect!
Made these over Christmas holidays and we loved them!!! Now that I think about, should make again!!
Yes, great idea, thank you so much Julie! So glad they were a hit!
Honestly, I waited on this cookie because I thought – just another sugar cookie, how boring. Boy was I wrong and it was actually one of the favorite cookies I made this season. I couldnt make them fast enough for my son as he was gobbling them down. They do remind me of a true sugar cookie, very soft and buttery tasting. I was very very surprised and very very happy!! These will be made for all school functions. Thank you!
Thank you so much Estee for the wonderful feedback! I love that your son loved them so much too!
I made your yummy cookies & loved every scrumptious bite!
These were really fast gone in our house!!! They were just perfect with a vegan café latte!
Oh wow, thank you so much Sophie for letting me know! Sounds delicious with a latte!
Hi Brandi! I made these again and was running out of vanilla so I subbed with almond extract. They came out great and I loved the almond flavor to them.
So glad to hear the almond extract worked great too, definitely will try that, thank you Kathleen!
Brandi you have no clue how excited I am about these! YUM!!! I will be trying it out 🙂
I’m literally squealing with excitement over these cookies, Brandi! Whipped them up this evening and let’s just say, we almost didn’t bake them because the raw batter was AMAZING!!! I’m in love with how sugary and vanilla-y they are, but without the refined junk or oil! The crackly top, slight crispness and pillow-y center is pure heaven. As soon as they cooled I tucked them away in our cookie jar and ran upstairs…I don’t trust they’d live to see tomorrow otherwise! Mine didn’t turn out as pretty as yours because sadly, I ran out of my favorite almond flour and the brand I had on hand wasn’t as fine…but did the trick because they’re the best darn sugar cookies I’ve had! I continue to be blown away by your creativity – who would have thought to use cashew butter in a sugar cookie?! Anyways, I digress. Merry Christmas to you and your beautiful family. Love you, friend! xoxoxo
Oh yay Mandy!! Your feedback totally made my day! I’m so so happy you loved these so much! Thank you so much for making them! I made them last night for my Christmas party and everybody loved them too and was amazed at the flavor with no butter or oil, I was so excited, lol! Thanks again. Merry Christmas! xo
These are so gorgeous Brandi! I love sugar cookies, and I love how your recipe is oil free!!! They sound so delicious 🙂
Thank you so very much Harriet, that is so nice of you!
Wow! Made them last night and they are amazing. I thought my sugar cookies days were gone forever. I can’t have oil/ butter. And I thought how can you make them with butter/oil? Well, you figured it out. I also did a substitute and used date sugar in the dough and also can’t have that much sweet and decreased the maple syrup to 5 Tablespoons and put the rest in as water. It worked. I am so thankful to have this recipe. Thank you and Merry Christmas.
Wonderful, I am so happy to hear this Debbie! Thank you so much for the amazing feedback!! I know oil/butter-free is unheard of for sugar cookies, but I was determined to make it happen! So glad you were still able to make them work by reducing the sweetener too, thank you so much!
Here is the problem with baking cookies… I sample them!!! 🙂 I usually taste one of what I am making to ensure they are gift worthy. Um, I had more than one of these! Yesterday I thought the Peanut butter cookies were the best. Well those have moved to second place and these sugar cookies move to #1. They are a little crispy on the bottom and then add in chewy and soft. I made half the batch a little smaller and then the rest the regular size. I used the bottom of a 16 oz glass and to press the cookies flat in an effort to get them the same size and width. Once the cookie was the size of the the bottom of the glass I just had to lift and gently pull off. My only challenge was grinding the sugar and that was because I was trying to be quiet this a.m. and doing small pulses. If I were doubling or tripling the batch I would probably use my Kitchenaid mixer as it would combine faster and less overworking of the flour. I’ll let you know should I go that route. Easy to follow recipe with helpful instructions provide a perfect cookie:) Thank you again for a great recipe Brandi!
I’m so happy to hear this amazing feedback Kathleen!! So thrilled to hear these are your #1 cookies now! So awesome to hear, thank you so much for making them and leaving feedback!
Brandi, these are soft and chewy and absolutely to die for! Such a treat! I am so glad I made two batches right away! They are almost gone. They smell and taste divine. Thank you, Dessert Queen! Happy Holidays!
Lana, I’m SO happy to read your wonderful feedback! I loved your pics of these on IG, they were absolutely perfect. SO happy you and your 3 year old loved them so much, thank you for making them and your kind words!
Wow, thank you so much for taking the time to brainstorm what could have gone wrong and respond, Brandi!! I did make sure I used the regular white rice flour. I also switched from using my stones, which is my go-to for cookie baking, to metal pans after the first batch. It didn’t make much of a difference, but I don’t have dark metal and that could be part of my problem. The other is that my oven is 30 years old and although I have a pretty good handle on how to work around the age issue, it could certainly be getting worse… hence being able to cook them for double the time. LOL
If Santa brings me a new oven I will definitely give this recipe another try! 🙂
Oh yes, that sounds like my mom’s oven, haha! Hers is around 30 years old and anytime she bakes my cookies, they take a few minutes longer too! I was shocked at the difference in the result of the pans, I updated the recipe above because of it. When I made more yesterday, I did one batch on my light baking aluminum pan and one batch on a regular dark metal sheet pan and the dark pan cooked them perfect at 8 minutes, nice firm golden bottoms and the lighter pan didn’t get as cooked of a bottom and took a little longer. Crazy how much a pan makes a difference, haha!
Glad you were able to make them work though by cooking them longer! 🙂
Wow, you are so clever, these sound fantastic! Your readers are so lucky you are committed 🙂
Sugar cookies = hands down, the best cookies on the face of the planet, and your creation…. Ups the ante times 293293! ha ah! No, but seriously.
So sweet Gigi! I’m so glad you loved these so much!! Thank you for your sweet comment!
Thank you so much for all the time and effort you put into creating these cookies, Brandi! Your tenacity for finding the perfect recipes makes your blog my favorite. ?
You were right. The batter for these is delightful! Unfortunately I can’t figure out where I messed up with these cookies. I used my food scale for accurate measurement, used the exact items called for, followed each step carefully, but for some reason they came out very gooey and under-cooked. I kept checking every minute afterwards but they were still very wet. I finally doubled the cooking time and they turned out puffed up, dry, and reminded my husband and daughter of the Stella Dora breakfast cookies they used to love, so all was not lost. We will be enjoying them with tea. 🙂
Please keep your incredible recipes coming, Brandi, because even when I make mistakes everything still taste delicious!
First off, thank you Colleen for your kind words, I really appeciate it! As far as the cookies, that is SO ODD! I’m completely baffled because I’ve already received 3 reviews on these and they have all been perfect! I made them many times and they were all soft and dry after they had cooled. They are a little undercooked upon removal, but as I mentioned potato starch continues to cook after removal and dry out baked goods. Mine were perfect right around 8 minutes, but like I mentioned in the directions, some ovens can vary. The only thing I can guess is that your oven temp may be a little off? Because if I were to cook mine at 16 minutes, they would be totally burnt and dry. 9 minutes was even pushing it. I do know many ovens vary. I know of at least 3 of my readers who usually have to bake their cookies for a few more minutes with each recipe. Also, you sure you used potato STARCH and not potato flour?? Because potato flour would make them extremely wet. Were you able to roll them into balls before baking? If so, my guess is we simple have very different ovens since yours worked perfectly after doubling the recipe. So glad it worked out in the end Colleen! 🙂
And a big thank YOU to making so many of my recipes, I get those feedbacks on the time and I love reading them! 🙂
My other thought is what type of pan did you use? I just updated the recipe since I noticed they cook more done on a dark metal pan, versus a light aluminum pan. Also, maybe did you accidentally used the glutinous type of sticky white rice flour? It looks the same as regular white rice flour but will leave things much more gooey. That is my only other guess, besides the oven temp being off. I just made another batch this morning and they turned out just perfect again, right at about 8 minutes on the dark pan.
What a brilliant recipe Brandi and I love the photographs. It reminds me so much of Frozen. So winter wonderland like and very magical. xo
You are so incredibly sweet Nissrine, thank you so much for such a beautiful compliment!!
Perfect, healthy sugar cookies and I love the festive pictures! Great job!
Brandi, these look incredible!!! I can’t get over how gorgeous these photos are – you really did an awesome job with creating a cozy winter wonderland. You continue to amaze me with your magical ways in the kitchen. I can’t even begin to imagine how challenging this recipe was to create because the sugar cookies we grew up with were loaded with butter and/or oil…and bad sugar! Definitely making these very soon – need to grab a couple of the ingredients from the store on Monday. Can’t wait!!
Thanks for doing all this work to develop what indeed looks like the perfect vegan gluten free sugar cookie. Yum!