
Vegan Gluten-free Vanilla Wedding Cake is a showstopper, amazingly delicious, perfectly sweet, soft, tender, buttery and moist and is so good, it tastes just like any traditional wedding cake. It is frosted with a melt-in-your-mouth vegan buttercream frosting.

Today you will learn how to make, assemble and frost your very own Vegan Wedding Cake that is also gluten-free and amazingly delicious! This is my first ever vegan wedding cake and I’m just ecstatic about it. I went into great detail and photos for each step to help you as much as possible, so it is a very long post for obvious reasons. I know this tutorial will look intimidating but I’m just very thorough in details, it really wasn’t that hard, just time-consuming.

This Vegan White Wedding Cake right here is my proudest moment ever when it comes to baking creations. It nearly brought me to tears with how happy the end result became. I honestly lost track of how often I tested this cake before finally arriving on “the perfect recipe”. When I shared a pic of this cake on social media, you all kind of went crazy for it and were so much more excited about the recipe than I expected, but very happily surprised that so many of you are interested in it. Many told me you now want to get married again, haha.
ABSOLUTE PERFECT VANILLA CAKE
This cake is the epitome of what a vanilla cake should be to me. It tastes like a cake made from cake flour, yet it is gluten-free and not made with vegan butter or processed oils (the cake recipe, not the frosting). You know, the ultra tender, cloud-like softness that dream cakes are made of. Since when did gluten-free cakes have to be SO dense, gummy and chewy. I don’t like my muffins, cupcakes or cake to be chewy! I have always felt that way, even with regular all-purpose baked goods. I remembered how soft and delicate the crumb was on my own wedding cake years ago, but I truly didn’t think I could achieve that with NO eggs, NO gluten and NO oil. Especially when I had so many flops in the kitchen while testing.
READER RECIPE REQUEST
You see, this recipe was a request from a very dear reader, Colleen, who has been one of the most loyal longtime readers for years. When she emailed me asking me to create a wedding cake for her daughter, I was completely flattered. I had always wanted to create a wedding cake for my blog, so her request was a good motivator to finally get it done.
She needed it to not only be vegan (obviously), but also gluten-free. Then, to make it more challenging, I personally wanted to make it without almond flour or oat flour, so that it could be much more allergy-friendly for most people. I had my work cut out.
Let me tell you how challenging it is to come up with a vegan, gluten-free, oil-free, nut-free, oat-free wedding cake that tastes just like a traditional wedding cake. No weird flour tastes or textures and slices well. This cake is incredibly moist, buttery, soft, tender, fluffy and just a magical dream. It does not taste gluten-free whatsoever.
I finally arrived at the perfect gluten-free combo for this cake and it’s only 2 flours. White rice flour and cornstarch. I tested it with brown rice flour and it was way too detectable for a light vanilla cake. Hidden by spices, it’s not noticeable, but in this cake it was gross and made it too dry/crumbly.
FOLLOW THE RECIPE!
Please do not sub the ingredients! Not even ONE. Period. Like I said above, with a wedding cake being such an important cake and cake texture being so important, changing one of these ingredients will alter the cake result drastically. If you cannot do rice flour or coconut, then this cake is not for you. I realize this cake will not fit everybody’s needs, but as you can see from all the other allergies I avoided, it’s impossible to fit everybody’s needs.
My suggestion is THIS. If you want to try experimenting with the recipe, that is fine, but I would suggest to please make the recipe as written FIRST so you know how it’s supposed to turn out. After all, I did a ton of work to share the recipe as is, then after you make it as written, feel free to try other subs or flavors. Have fun with it!
The reason for each ingredient:
- White rice flour: Gives lightness and much better binding than brown.
- Cornstarch: This specific starch helps make the cake fluffy and also acts as eggs. Using a large amount with the rice flour created the softest and most tender gluten-free cake I’ve ever made. Without starch, gluten-free baked goods are too dense and gummy for me. Nope, I like light and fluffy.
- Full-fat coconut milk: Provides wonderful moisture and lightness to the cake.
- Coconut butter (pureed coconut into a creamy liquid): Provides richness and exceptional buttery taste to the cake that makes it so darn moist and freaking amazing! Surprisingly, this cake does not taste like coconut! It just tastes buttery and amazing!
- Cane sugar: I very rarely ever use white sugar, but for a special rare occasion like a wedding cake, it was a must. I didn’t want a cake that was going to be served to guests to taste like maple syrup or too different and also wanted the cake to be as white in color as possible. It’s worth it, trust me!
PLAN AHEAD
Give yourself an entire day or 2 days before a wedding to get this cake done. It took me 2 days because I have a child and couldn’t work nonstop on the cake all at once, but it could easily be done all in 1 day with focus and you have the time. I don’t really recommend making it more than 2 days in advance or it starts to dry out.
If you are just interested in making a 3 layer vanilla cake and not a full-on tiered wedding cake, then you can skip all of the cake building details for the most part. Just bake the three 8 inch cakes and frost as you see pictured if you like. But for the wedding cake or a special occasion tiered cake like this, follow the tutorial.
TOOLS YOU NEED TO MAKE A WEDDING CAKE
First things first, tools you will need if you are serious about this cake and/or cake decorating in general. I’m a baker, it runs in my veins, so these are essential to my cake baking needs. The items in red take you to the link of the item.
- Cake boards. You will need a cake board (cardboard) for each cake size of each tier and the bottom layer of each tier. So for this wedding cake, 3 8 inch boards and 3 6 inch boards.
- Cake turntable. This will make frosting a cake 10 billion times easier than just using a stand, trust me. I actually used 2 here. One for each tier. It made it much easier to ice each one separately (do one while the other is chilling) without having to remove each cake from the stand to ice the other.
- Offset spatula. Makes frosting way easier than a straight spatula, especially for frosting the tops.
- Cake Lifter. When dealing with cake building, having a cake lifter to transport will save you tears from moving the cakes and cracking or dropping them.
- Bench scraper. This works exceptionally well for smoothing the sides. I actually just used the cake lifter above to do this since it was nice and large to accommodate the 3 layers. Some people will attempt with a spatula, but nope, big pain in the wazoo that way for me.
- Dowels. These are for giving structure to the tiers to support the weight of top tiers. Otherwise, your top tiers will sink into the cakes below them. Not good friends.
- Fondant smoother for perfect looking frosting
- Parchment paper
- Large serrated knife
- Large whisk (this makes a TON of batter)
- Electric beater for frosting
- LARGE bowls. This makes a lot of cake and frosting, so you will need giant bowls. Or use a pot if you have to.
- Cake pans. Several. You need as many as cakes you are making. Since I made 3 6 inch cakes and 3 8 inch, I had 6 cake pans for all 6 layers. The cakes that are all the same size bake at the same time, so you need all. I buy my cake pans at JoAnn Fabrics or Hobby Lobby. Aluminum works the absolute best.
- Large serving cake board or stand. I used a heavy-duty 10 inch cake drum designed for heavy cakes. (The silver board you see in the finished cake photos. I got mine at JoAnn Fabrics. They look like this.
- Icing tips of whatever style you like. To add the pretty large dots around my cake, I used Wilton tip #3. It is great for writing, but also beautiful dots at any size.
- Coupler for attaching the tip, otherwise your tip will slide all over the place. Also, I use the coupler for adding the perfect even amount of frosting in between each cake layer.
- Pastry bag for decorating with icing.
- Cake dome to keep the cake covered to keep it moist. We don’t want a dry cake. I recommend two. One for each tier since it will be too tall for the whole cake to fit in one cake dome.

PREPARE THE VEGAN BUTTERCREAM
Set out your vegan butter sticks early in the day or several hours before you want to make the frosting (or the night before), so that they can be totally soft and at room temperature, otherwise it will be impossible to beat the frosting. Follow the recipe below to make the frosting and leave out at room temperature covered with plastic wrap until ready to ice the cakes.
You will need A LOT for this entire wedding cake, so don’t freak out. You will need a very large bowl so the sugar doesn’t fly everywhere. I based this wedding cake buttercream recipe off of my original frosting recipe from my Best Vegan Vanilla Cupcakes, but instead of all vegan butter, I subbed half with shortening. This is important so that the frosting sets up and holds better. I also like the flavor better and it’s more white than made with all butter. Now, I know, normally I never use any oils in my recipes and I actually don’t add oil to the cake recipe, but for a very special occasion like a wedding cake, a traditional buttercream is important for both appealing to the taste buds of a crowd, as well as aesthetically-pleasing to the eye and structure. Nobody wants a wedding cake with a melted messy frosting. I make exceptions when needed. And trust me, this buttercream is to die for.
MAKE THE VEGAN WEDDING CAKE
Before getting started, make sure you have space set aside in your fridge to add these cakes to. You will need the room! Next, make sure your coconut milk is at room temperature or slightly warm. It cannot be cold whatsoever or it will cause the coconut butter to seize up and ruin the batter. I recommend just using straight cans and not from the fridge so that they are already at the best temperature and you will need a good amount anyways. I highly recommend Thai Kitchen brand, it works the best and is always smooth, never chunky.
Preheat the oven to 350°F (177°C) and lightly spray with nonstick spray three 8 inch round aluminum cake pans (they bake evenly and work the best) that are 2 inches tall on the sides. Do not flour the pans. I use coconut oil nonstick spray and it works like a breeze. Wipe off any dripping excess oil. Place a round piece of parchment paper on the inside of each pan cut to fit neatly inside. The easiest way to do this is to place the pan on the paper and trace around the pan with a pen and cut just inside the line.

Melt the coconut butter until it is the consistency of oil, as pictured. It should be 100% smooth and runny. This is very important for the batter to mix properly. I use and love the MaraNatha brand, found at most stores, it is 100% smooth. I do NOT recommend homemade coconut butter for a wedding cake like this, as the texture will never be as smooth and will yield bits of coconut in the cake.
Now, buying the jars at the store, it will be solid, so the best way to work with this is to take off the lid, heat up the jar in the microwave for 15-30 seconds or so, just until it becomes soft enough to scoop it all out into a separate glass container. I find this much easier and important to store coconut butter, otherwise the oil separates from the coconut meat and is not mixed up properly, which will affect your cake result texture-wise and flavor-wise. The above picture is the coconut butter added to a glass container, then heated just a few seconds until I can stir it enough to fully mix the separated oil and coconut together and reach this very runny texture. You have to be very careful about overheating coconut butter or it will burn it and make it mealy. Depending on your climate, more or less seconds in the microwave may be needed.

First, make the 3 layer 8 inch cake: (you will bake the 8 inch cakes first)
Grab a very large bowl and add the white rice flour, cornstarch, sugar, baking powder, baking soda and salt. Whisk very well until mixed. Refer to the written recipe below for the amounts needed and always, always use a scale for accuracy, especially with cakes.

Important: With full-fat coconut milk, the coconut cream will separate from the water in the can. You will need 3 cans to have enough milk (if just doing the bottom 3 layer cake and 4 cans if doing the full cake). You need to scrape out all of the water and cream from the cans into a blender or another bowl and either blend it until smooth or whisk very well until completely smooth and mixed. If you do not do this first, you run the high risk of either getting too much cream or too much water and not the right mixed combo of each, will be really affect the cake’s texture. Please do not skip doing this! Weigh the appropriate amount in a separate large bowl. Add the melted coconut butter (refer to the note above on how to properly melt it) and then the vanilla. Whisk until smooth.

Make a well in the bowl of the dry ingredients and pour in the liquids.

Use a large whisk to mix until the batter is completely smooth, making sure to scrape from the bottom of the bowl too. The batter should be somewhat thick, but pourable, not runny.

BAKE THE CAKES
Divide the batter evenly among each cake pan and smooth out the tops with the back of a spoon if needed. Pick up the pans and lightly jiggle them side to side to make the tops naturally smooth out.
Bake all three 8 inch cakes at 350°F (177°C) at the same time on the center rack for 25-30 minutes until a toothpick comes out clean from the center of each cake. All mine were done right around 28 minutes. A few dry crumbs are ok, but not wet batter! Make sure you do not open the door until you are at the 25 minute mark so you don’t mess up the baking.
Tip: If making both tiers, while your 8 inch cakes are baking, start lining the 6 inch pans and getting the batter ready for those.

COOL THE CAKES

WRAP THE CAKES
Cool the cakes a minimum of 1 hour or fully in the pan (I cooled mine completely in the pan). This will not negatively affect the result, in fact, since it is a super soft gluten-free cake, leaving it in the pan to cool ensures its structure better.
To remove after cooling at least an hour, place a plate over the pan and flip it over. Then place a cake board the exact same size as the cake onto the bottom of the cake and flip it back over and place onto a cooling rack. Repeat with each cake. The cake boards are very important for transferring the cakes easily so that you can frost the cake properly since you will be moving them a few times. If you try to keep picking the cake up itself (with no board) with your hands, they are much more likely to crack. Let it fully cool, about another 30 minutes or so and then wrap with plastic wrap fully carefully (including all around the bottom cake board).
CHILL THE CAKES
DO NOT skip this step or you will have a crumbly mess. Magic happens at this chilling step. Place in the fridge for about 30 minutes only to firm up just a bit to make trimming and frosting the cake MUCH EASIER.
Do not chill it any longer than that or it will cause the cake to begin to dry out. We want to get the frosting on there fairly soon to add another protective layer of moisture. Remember at any time to not remove the plastic wrap from your cakes until ready to frost so they don’t dry out.
Chilling the cake briefly also helps “set” the gluten-free flours a bit more and it becomes a dream to work with, so do not skip this step or any of them please.

TRIM THE CAKES
Place your cake with the cake board underneath onto your cake turntable. Using a cake lifter helps transferring the cakes a breeze.
Next, we are going to trim a thin layer of the slight domes off the tops of the cakes with a large serrated knife. Chilling the cake 30 minutes before this step makes working with the cake a breeze. The best way to do this is gently move the knife in a sawing motion while placing your opposite hand over the top as you hold down the layer you are trimming and slightly rotate the cake as you do this. This is where a cake turntable helps out. Now, do not go crazy trimming and butcher it or you’ll create a concave top. Just lightly trim off a thin layer. Doesn’t have to be 100% perfect, just visually level. This is important so that the cakes are all flat and even and stack properly and straight. Your finished cake will look best and also, stacking domed cakes don’t sit evenly and can cause them to crack.
If you make a bit of a mess or crack the cake slightly, don’t stress, icing covers mistakes well 🙂

There, nice and flat and ready for the first layer of frosting. Also, you get to nibble on some cake crumbs from the trimmed tops. 🙂 By the way, do you see how soft and fluffy that texture is??

The best way to ice each layer evenly so it looks beautiful when you cut into it is to use the coupler tip (instead of a decorating tip) and a pastry bag. You will need about a cup for each layer. Just swirl it all the way around starting from the outside and keep swirling until you reach the center and the whole layer is covered. Do not spread or flatten it out. Placing the next cake layer will flatten it some and make it perfect for when slicing the cake happens.
You ever notice how when you see the interior of some cakes there is hardly any icing in between each layer? That is because it is hard to detect how much you are adding once you start spreading, so this technique makes it perfect…see dreamy inside shots below!

Ignore my spread out frosting on that bottom layer. That was a mistake that I learned during this process. Just leave as is after you’ve swirled it on. Now to add the 2nd layer (make sure you’ve trimmed the top off first) and place the trimmed side face down so that the flat part is upright. Remove the cake board from the 2nd layer.

Repeat the frosting for the 2nd layer and add the 3rd layer, remembering to put the trimmed sides face down and remove the cake boards.
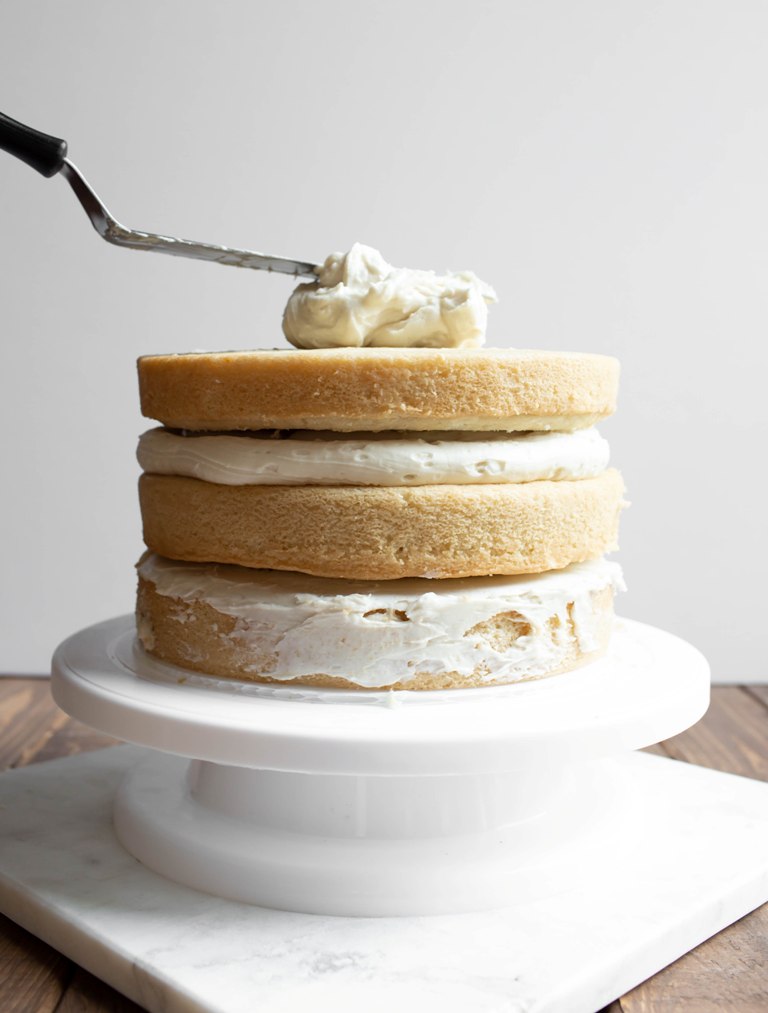
Add the crumb coat:
Add a large amount of frosting on the top of the cake and smooth it out to hang over the sides. Add large amounts to the sides as well. Don’t worry about adding to much because the smoothing step will remove excess if needed.

Now, some people ice cakes different ways, but I found this new method as I was icing this cake to work the best and easiest.
Basically you will be applying the icing on the sides by adding large amounts every couple of inches, smooth around the cake and then make sure it’s all even by pulling the offset spatula in upward strokes.Go around the whole cake smoothing it out and evenly so that most of the cake is covered. It doesn’t need to be perfect since this is just the crumb coat. Since we chilled the cake, it should smooth over fairly easily.
To ensure my frosting is evenly applied, I came up with this frosting technique of upward strokes around the sides. Remember to wipe off excess frosting continuously as you are smoothing out the cake or it will never get smooth.
Tip: Use 1 separate bowl for the crumb coat frosting scrapings so you aren’t mixing the messy crumb icing with the clean icing. Keep using that crumb icing to finish the crumb coat.

Now use the bench scraper or icing smoother to drag along the sides of the cake while rotating your turntable. Scrape the excess off into the crumb coat bowl and keep repeating until it is smooth. This is tricky to get down, so refer to youtube tutorials to help.

See that excess? Wipe this off continuously into the crumb coat bowl. This is how you will get a smooth finish.

Now to smooth the top, use your offset spatula to gently drag the excess icing off starting from the outside edges and pulling it towards the center. Keep wiping the excess icing off and repeating until you get it as flat as possible. Be patient, it takes time. Remember if it’s uneven, then your whole cake will be a bit lopsided in the end.

See, look how straight and smooth that crumb coat is! This will make the final frosting look that much better.
Now, place the crumb-coated cake in the fridge as is (carefully!) until it’s firm and no longer sticky to the touch, about 30 minutes. But don’t leave it in there much longer than that or it will get too hard and cold and can dry out the cake.

Repeat the steps for the 3 6 inch cakes:
While the bottom tier is chilling, repeat the same steps above for layering and adding the crumb coat to the 6 inch cake. I used an additional cake turntable so life would be much easier. Please see the NOTES below on the printed recipe for the ingredient list and amounts for the 6 inch cakes. For the 6 inch cakes, they will bake anywhere from 22-30 minutes. Mine were done at 25 minutes.
After your 6 inch cakes have cooled completely following the steps above, wrap them as well in plastic wrap each with a bottom cake board to keep them sturdy and place them in the fridge to chill for 30 minutes as well, while you move on to add the final frosting layer to the bottom tier.

Add the final frosting layer:
Add the final coat of frosting following the same method (as above) of smoothing the sides and top. This will require much more patience and detail to get it smooth. You are going to want to add a large amount of frosting on top of the cake and smooth out and push it out to the edges of the cake, letting it hang over. Then add large amounts of frosting on the sides about 1/2 inch thick so that it completely covers the crumb coat. It’s best to add a lot than not enough, so that way it will be smooth and even. Smooth it fairly well with the offset spatula turning your rotating cake stand. Then use a bench scraper to hold it against (gently) the sides and spin the cake stand slowly as you drag the scraper along to create a smooth effect. You will need to fill in any gaps or holes with extra icing if needed. Continue to scrape off excess icing in between smoothing and repeat until it’s as smooth as you can get it. It’s the same process as I did above with the crumb coat, just with more precision since it’s the final layer.
Now place the cake back in the fridge for about 15 minutes only just so it’s no longer sticky to the touch. This is just to mildly chill it so that it’s ready to be smoothed out even further with a Viva paper towel. You can skip this step if you are not interested in a ultra smooth look, but as you can see, it makes it almost like fondant with this step.

Transfer the bottom cake to the cake stand:
You will now transfer the bottom tier to the cake dome or cake stand using a cake lifter.
Smooth the frosting with a Viva papertowel:
After the bottom tier has chilled with the final frosting layer for 15 minutes and no longer sticky to the touch, you can gently apply a Viva paper towel and go around the cake to smooth it out even further or any imperfect spots. You have to have a gentle hand and gently apply pressure with the fondant smoother. You will go back and forth and in circular motions along the sides and top. Be gentle when smoothing the top round edges. Very gently and slowly peel off the paper towel. Do this for each tier (I forgot to take a photo of doing it to the bottom tier, which is why you see me smoothing the top tier) until it is as smooth as you like or have patience for, lol. Refer to youtube videos again, this will help. This will not work if your cake hasn’t chilled for about 15 minutes first. If your papertowel is sticking too much, chill it a few minutes longer.

Adding the dowels for structure:
Insert 1 dowel gently through the center of the cake and mark where it meets the top of the cake with a pen or food-safe pen if you afraid that you will touch the icing with the pen.
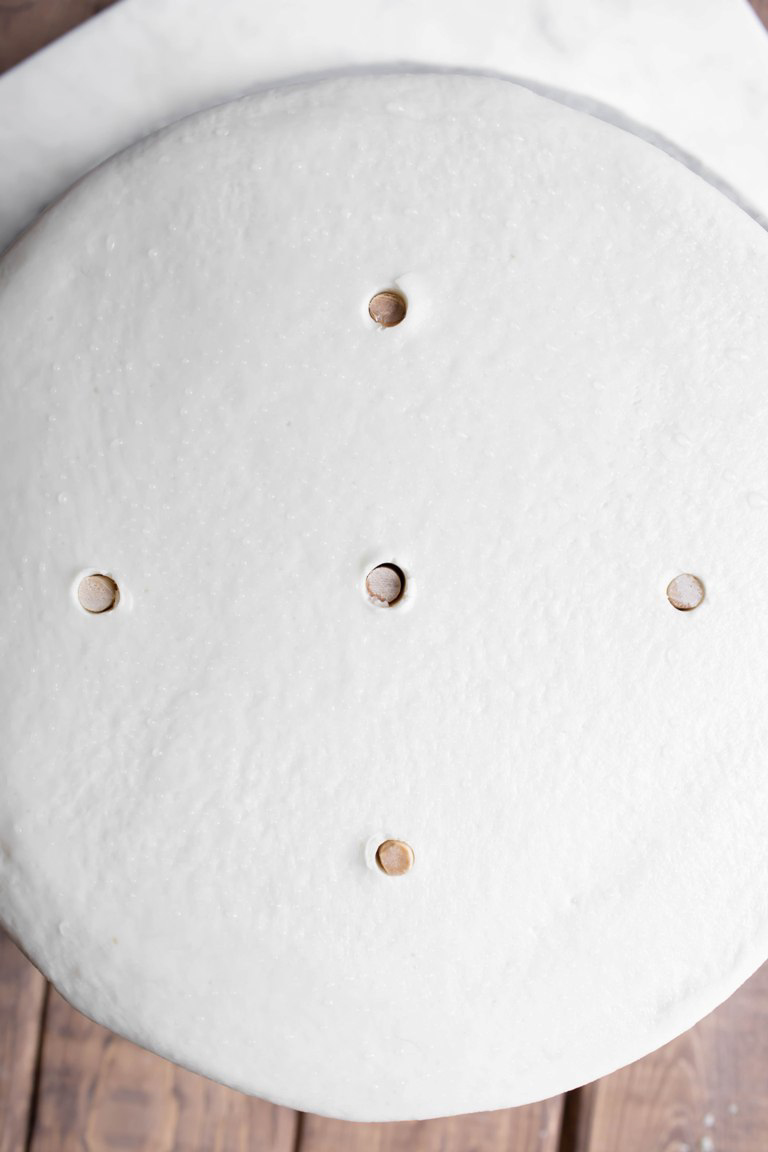
Remove the dowel and cut with sharp shears or and line up 3 more dowels next to the one you already cut and cut those to match the size. Insert all 4 dowels into the cake as pictured, about 2 inches apart, keeping in mind the shape of the circle so that the top tier covers it. Repeat this process in a circle 2 inches apart as pictured, keeping in mind the top tier will need to cover it correctly.

Now place a round piece of parchment paper the same size of the top tier in the center of the bottom layer on top. This is so when the servers at the wedding serve the cake, it doesn’t take off a big blog of icing with the top tier when they pull the cake board off.
Add a dollop of frosting on top of the parchment paper in the center to act as “glue” for the top tier.

Add the top tier:
Now, I don’t recommend adding the top tier until the day of the wedding/event because you will need to keep both tiers covered in cake domes so they stay moist and the whole cake will not fit under one cake dome. Since both tiers will have already been frosted, it doesn’t take much time to just add it on top. To make transferring the top tier easier, I suggest chilling it about 15-30 minutes or so in the fridge beforehand so you don’t mess up your pretty frosting. This is what I did before placing it on top. Use the cake lifter to carefully transfer it from the fridge and place on top of the bottom tier. Remember, the cake board is underneath the top tier and keeps it from sinking into the bottom tier.
If you make any oopsies after transferring, just use the fondant smoother and papertowel again to smooth any imperfections out.
Tip: Now, I did not add a center dowel for the top tier since this is just a two tier cake and I didn’t feel it was necessary. If you are transferring it to a wedding and are paranoid the top tier will slide, then add a dowel measured the height of the cake and poke a whole through the center of the cake board that is at the bottom of the top tier in the very center before you add the top tier. Then add the top tier and insert the dowel down the center of the cake and push through until you hit the bottom. Use another dowel to push the tip down once the end of the dowel reaches the top of the cake, not your fingers or you may mess up the icing. Cover the spot with frosting and smooth out.

Time to decorate:
Decorate any way you choose. I used an icing tip to make simple elegant dots around each tier. This also hides any imperfections around the bottoms, as well as the cake boards. I then added sugar white roses around the cake. I wanted a simple, but naturally-flowing look to the cake. Elegant but simple. I bought the white roses. That was the only thing I didn’t make. I would not do them again if the cake needs to sit out for a really long time because they started to fall off from the frosting because they were too heavy.

Voila! There she is! Beautiful white vegan wedding cake. Well, technically it is more of an off white, not totally white, but I got it as white as possible. Even traditional white cakes are not truly “white”, but more of a pale, pale yellow, which this one is. The baking soda does give it a bit of pale yellow tint.
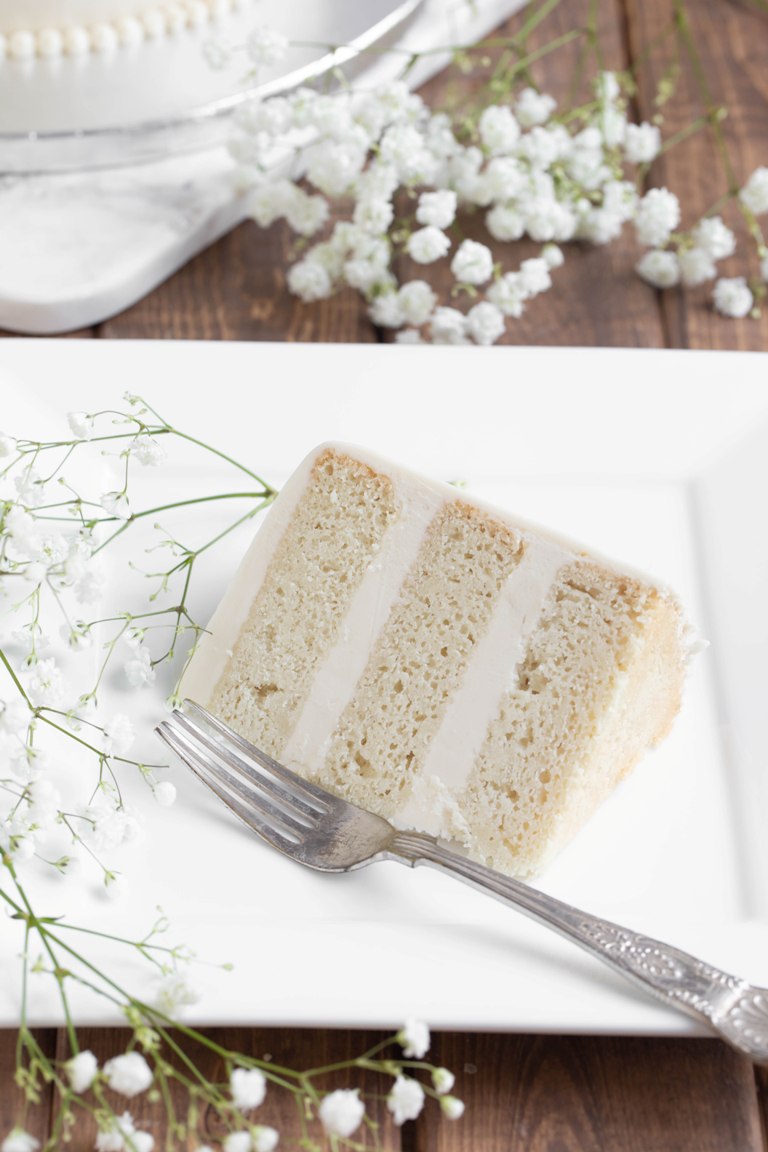
Ready to slice and see this beauty on the inside??

It slices beautifully, is magically moist, delicious and check out those perfectly even frosting layers. Again, following these exact steps, particularly the chilling steps during the process, helps to set this cake’s structure.

My cake diet was so worth the end result.

This will be the showstopper at the wedding or special event.

Fluffy, soft, super tender and just like a traditional wedding cake.
I strongly recommend watching wedding cake youtube tutorials (there are 100’s!). I watched many of them for hours and it helped me immensely to learn how to properly structure a wedding cake. Seeing them in action helps. There are many different methods of how people do it and I shared today what I felt was easiest for me in my own way, but the videos helped so much as a starting point. It is time-consuming, yes, but it’s worth it and it really wasn’t that hard, just a lot of steps/time. Plus, a wedding is a special day.
I hope you all love this cake as much as we all do. It is magically delicious and beautiful to look at. Please follow the exact recipe and steps so you can have the correct results. It is all worth it.
If you’d rather just make cupcakes, then make these Vegan Vanilla Wedding Cupcakes instead!

Vegan Gluten-Free Vanilla Wedding Cake
Ingredients
- 3 cups (480g) regular white rice flour
- 1 1/2 cups (192g) cornstarch
- 2 1/4 cups (432g) fine pure cane sugar (I used Florida Crystals brand which is a very pale color, but white will work)
- 3/4 teaspoon baking soda
- 1 tablespoon (15g) baking powder
- 1 1/2 teaspoons fine salt
- 3 3/4 cups (900g) full-fat coconut milk, room temp! (Thai kitchen is the absolute best texture of milk) DO NOT USE POLAR BRAND
- 1 1/2 cups (360g) liquid coconut butter, slightly warmed (I use the MaraNatha brand from Sprouts, I’m sure other locations sell it too)
- 2 tablespoons (30g) vanilla extract
VEGAN BUTTERCREAM FROSTING (Yields about 6 cups frosting, double the recipe for the full cake to ensure you have enough)
- 3 4 oz (1 1/2 cups, 336g) Earth Balance vegan butter sticks
- 1 1/2 cups (288g) Spectrum Organic Shortening
- 7 1/2 cups (1,140g) powdered sugar (I used Sprouts Vegan)
- 1 tablespoon white vanilla powder (I use this instead of extract to keep the frosting white. You can sub with extract if you like, but use HALF.)
- 3 tablespoons (45g) coconut milk
NOTE
- Please absolutely USE A SCALE! It's SO important for accuracy in baking, especially with cakes and even more so, a cake like this. I cannot stress this enough. Make sure you are zeroing out in between each ingredient and add them slowly as to not too much. Do not sub even one of these ingredients. I worked endlessly to perfect this recipe and each ingredient plays a very important role. If you are allergic to any of these ingredients, then unfortunately this recipe is not for you. It simply is not going to work out as intended by changing it. THE only ingredient you could try subbing would be the cornstarch for potato starch (same weight amount) but I've baked for years with each starch and they ALL act differently, particularly with cakes. I tested tapioca and it is NOT a suitable sub for this because there is a large starch amount and made the cake nasty, gooey and chewy. Potato starch may work, but it WILL make the cake a bit more crumbly since it doesn't bind quite as well as cornstarch and makes things a bit more tender/dry.
- I use this scale.
Instructions
- DO NOT MAKE THIS CAKE MORE THAN A DAY IN ADVANCE or store it in the fridge. Because of the high starch amount, it will start to dry out after a full day of sitting (the first 24 hours is the best, most moist and buttery result) and storing it in the fridge will really dry it out and make it hard.
- This written recipe is only for the three 8 inch layer cake (bottom tier) since I figured a lot of readers will just want that recipe for birthdays or whatever. If you are wanting to make the whole cake as pictured with the top 3 6 inch layer tier, see the NOTES below for the recipe for the top tier 6 inch 3 layer cake and follow the steps in the post.
- Believe it or not, this cake has a very mild coconut taste. I had taste testers not even pickup that there was coconut, but if you hate coconut, you will likely taste it.
- Please refer to the actual post for the detailed step-by-step instructions. If just wanting to make an 8 inch 3 layer cake (the recipe above is for that only) and not a wedding cake, then you can just skip the dowels. Please still follow the other instructions for chilling the layers for JUST 30 minutes before trimming and frosting, as this step is important for "setting" the cake, as well as further sets the overall structure of the cake. Since this cake is gluten-free, this magical step works beautifully with this brief chilling. So, in other words, do not frost this cake until after it has chilled in the fridge 30 minutes, ok? This applies whether you are doing just a basic 3 layer cake OR the full 2 tier cake.
- If you are wanting to make the whole cake as pictured with the top 3 6 inch layer tier, see the NOTES below.
- Make sure your coconut milk is at room temperature and see post above for the coconut butter info.
- Preheat the oven to 350°F (177°C) and lightly spray with nonstick spray 3 8 inch round aluminum cake pans (they bake evenly and work the best) that are 2 inches tall on the sides. Do not flour the pans. I use coconut oil nonstick spray and it works like a breeze. Wipe off any dripping excess oil. Place a round piece of parchment paper on the inside of each pan cut to fit neatly inside. The easiest way to do this is to place the pan on the paper and trace around the pan with a pen and cut just inside the line.
- Grab a very large bowl and add the white rice flour, cornstarch, sugar, baking soda, baking powder and salt. Use a large whisk very well until mixed.
- With full-fat coconut milk, the coconut cream will separate from the water in the can. You will need 3 cans to have enough milk (if just doing the bottom 3 layer cake and 4 cans if doing the full cake). You need to scrape out all of the water and cream from the cans into a blender or another bowl and either blend it until smooth or whisk very well until completely smooth and mixed. If you do not do this first, you run the high risk of either getting too much cream or too much water and not the right mixed combo of each, will be really affect the cake's texture. Please do not skip doing this! Weigh the appropriate amount in a separate large bowl.
- Add the liquid coconut butter and vanilla and whisk until smooth.
- Make a well in the dry ingredients and pour in the liquid. Whisk until completely smooth, making sure to get the bottom. Make sure it's all completely mixed.
- Divide the batter evenly into all 3 pans and smooth out the tops with a spoon. Pick up the pans and slightly jiggle them to even out the tops.
- Bake all three 8 inch cakes on the center rack for 25-30 minutes until a toothpick comes out clean from the center of each cake. All mine were done right around 28 minutes. A few dry crumbs are ok, but not wet batter! Next, (if doing) start the 6 inch cakes (recipe for those under NOTES below), they will bake anywhere from 22-30 minutes. Mine were done at 25.
- Refer to the above post for detailed cooling instructions and further cake details.
- To make the buttercream, add the room temperature softened vegan butter and shortening to a huge bowl and beat on low until just blended. Add the sugar about a cup at a time blending on low until all is incorporated. Add the milk and vanilla and beat just until light and fluffy. Cover with plastic wrap to keep it moist until ready to frost.
Notes
- This wedding cake size (the full one pictured) will serve around 40-50 guests considering wedding cakes slices are typically smaller than traditional birthday cake slices.
- To Make the Top Tier (6 inch 3 layer cake): you will need to also make this recipe:
1 1/2 cups (240g) white rice flour, 3/4 cup (96g) cornstarch, 1 cup + 2 tablespoons (216g) fine pure cane sugar, 1 1/2 teaspoons (7g) baking powder, 1/4 + 1/8 teaspoon baking soda, 3/4 teaspoon fine sea salt, 1 3/4 cups + 2 tablespoons (450g) full-fat coconut milk shaken well, 3/4 cup (180g) liquid coconut butter, 1 tablespoon (15g) vanilla extract - Follow the same steps for preparing the batter as above. Baking time is a bit less, from 22-28 minutes. All 3 are baked at the same time and mine were done at 25 minutes.
Please respect my hard work here and do not copy my recipe or repost the written recipe anywhere. Please link to me instead giving proper credit. I work very hard to create my recipes and share them for free, so please be respectful and link properly. If you are inspired by this recipe, again, please give proper credit.
This recipe came at the perfect time- needed a beautiful allergy friendly cake for book club on the lake. And although I didn’t do all the fancy decorating with the icing, using flowers and fresh fruit did the trick.
I didn’t have everything on hand and used the following substitutes quite successfully:
Didn’t have enough cornstarch so used 1/2 cup potato starch with the rest cornstarch
Didn’t have enough coconut BUTTER so used 1 cup coc butter and 1/2 cup white sweet potato
Didn’t have any full fat coconut milk so used 3 cups almond milk and 3/4 cup sunflower oil (to create fat)
I didn’t have enough white rice flour so used about 1/2 cup sorghum.
The cakes turned out SUPER moist, so I would even skip the oil next time since I avoid oil and use straight almond milk
There was no coconut flavor even though I was SURE it would taste like coconut!
I added lemon juice instead of milk to the icing and it gave a super fresh tasting vibe to the cake. I didn’t frost the sides, just the middle and top. I posted the pic on Instagram @lorisquinn
All of my non-vegan friends LOVED it and were so impressed. Thank you for taking the time to post this! I cook very similar to you but don’t have the time and talent to post recipes- it is a lot of work. Keep it up please!
Thank you so much Lori for making it! I’m so glad it was a success with you and all of your friends, even with not having the full amount of coconut butter or rice flour! Glad my suggestion of trying with the potato starch worked too, especially since it wasn’t the full amount since I find using all potato starch can make things too crumbly/dry, especially when there is a large amount (like with this cake). I would even give it a try next time with the full-fat coconut milk because while it does make it really moist, it makes it SUPER fluffy and sometimes using oil can make things too wet/dense. Your pic was beautiful on IG and I’m just so happy you loved it even with the minor changes! Thank you for sharing!
Extremely beautiful, love your site
Thank you so very much Maria! So happy to hear!
WOW Brandi! Well done! This is such a beautiful work of art! Thank you for including the cupcake recipe, that would look equally beautiful! I think some fresh flowers on top would look so beautiful. Definitely tucking this one away for a special occasion!
Aww, thank you so much Julie, I really appreciate you checking out the post! You are so welcome, so many people have requested it now that I’m actually going to make a whole separate post for it since it’s totally different ratios and will make it easier for readers to follow it that way than going through this whole post!
This looks more than spectacular. I’m looking for a birthday cake to make soon and this just looks gorgeous. Do you think I could divide the three layer cake mixture into two cake tins to make a double layer? I’ve made your cinnamon bundt cake countless times and it’s always been a huge hit. Would love to wow my husband on his birthday with this beauty!
Hi Trish! Thank you so much! Yes, definitely! I have the written recipe saved as just a 2 layer cake since others have requested that as well and to make it easier for you, I can email you that exact recipe. Email me at thevegan8@yahoo.com and I can shoot it over to you! 🙂
I made the wedding cake into muffins and used her funfetti frosting from her funfetti cake. This is absolutely the lightest, fluffiest, most heavenliest, butteriest cupcake we’ve ever ever had. Brandi you totally outdid yourself and thank you so so much for giving the cupcake option. It’s amazing!!! Honestly I’m surprised the batter even made it into the cupcake liners. Wow, that’s pretty much all we can say. I tagged pics #thevegan8 on IG!
Yippee!! So so so very happy you made them as cupcakes and loved them so much! Thank you for the beautiful pic on Facebook and sharing this awesome review, you described them absolutely perfectly! Thank you Estee!!
Hi Brandi, this looks amazing! I don’t have any special occasions coming up but I was thinking of trying it just for fun! A few questions:
– Is coconut butter the same as coconut oil? I haven’t heard of coconut butter and can’t seem to find something by that name.
– Do you think it’s possible to half the recipe and make these as cupcakes? If so, about how long do you think they should be cooked for (assuming I’d test with a toothpick)?
– Do you think it’s possible to add some berries to the buttercream frosting? It’s red currant season here and I thought it would be fun to add some to the frosting and then use them as decoration.
Thanks – if it works out I’ll email you photos!
Hi Burgen! Thank you so much! No, coconut butter is definitely not the same as coconut oil and definitely don’t use the oil haha. Coconut butter is the full coconut meat pureed into a liquid (but it’s solid when you buy it so follow the steps to melt it) whereas coconut oil is JUST the separated fat from the coconut. Very different. Also, the coconut butter is white since it’s the full coconut meat and oil is of course clear and way greasier, thinner. Coconut butter is sold at most grocery stores in the nut butter sections. MaraNatha is a very popular brand and that’s what I use and love. It is sold at Sprouts, Kroger and online, etc.
Yes, you can definitely make these as cupcakes! in fact, I just updated the recipe yesterday with the cupcake recipe. Just scroll down to the very bottom of the recipe under NOTES and you’ll see the recipe and buttercream ratio for the cupcakes. They are to die for as cupcakes too. Softest lightest cupcakes ever. You could try adding berries to the frosting but it will make it runnier so not sure how it would hold up texture wise. You would have to experiment. Can’t wait to hear Burgen! 🙂
Hubby and I are on a road trip as I type this, so I’m whiling away the time reading your post/tutorial and updating him with facts and figures and all your beautiful pictures. I told him “we can do this”!! For some reason he HATES cooking but LOVES playing with cake decorating tips and the like. So, he readily agreed….surprising! I think we’ll start with the cupcakes once you update for those, then graduate to just one round, and maybe, someday, the whole shebang for a special occasion for us or someone we know. We have a monumental wedding anniversary coming up later this year, so….hmmmm. Thanks for this inspiring recipe and loved the moving story behind it!
Aww, thanks so much for taking the time to read it all Marlene!! Oh, that is too cute about your hubby! He’s a smart man because cake decorating is sooo much fun! Haha. Yes, I updated the cupcake version last night, yay! Just refresh your browser and you’ll see them at the bottom of the recipe under NOTES. Can’t wait to hear when you make them!
Hi Brandi
Thanks alot your recipe is perfect,but this is first time knew that’s cake should be chill.
Thank you
Hi Zubaida, thank you! Not all cakes need to be chilled, but for this type of a cake and being gluten-free, I discovered a magical binding effect with the gluten-free flours that really do set the cake well for a brief chilling. The cake is just a tad too tender before chilling it. Still to die for yummy but it just makes it MUCH easier to work with once it chills a bit 🙂
I have no need for this cake but I really really want to make it! That looks amazing. After all the recipes of yours that I’ve tried, I have no doubt this one will be just as incredible as your others. Kudos!
Thank you so much Elyse, that is so sweet of you to say!!
Excuse me while I just sit here and stare and admire this BEAUTY!!! WHOA!!!! I have been anxiously waiting for this post ever since you emailed me about it and now that it’s here, I’m just in awe. Dang, mama!!!!! What a beautifully detailed and thorough tutorial. We already knew you were incredibly talented, but then you go ahead and CREATE A WEDDING CAKE?! It seriously looks professionally done – something you’d order through a high-end bakery. It is gorgeous!!!! I admire your dedication and patience because even just trying to create Willow’s bday cake a couple of years ago drove me bonkers with all of the trials, but a wedding cake is a whole new level of dedication. It looks perfect, my friend! The cake itself looks a little like pound cake…soft, tender, buttery, fluffy, kind of melts in your mouth delicious. The color of the cake alone is stunning – so pure! And then comes the buttercream. HOLY. It’s been ages since I’ve had buttercream and this looks like the real deal. And so beautifully white! I’m seriously SO impressed. Good lord, then seeing a slice of it up close?!?! AH! Perfect layers and no skimping on the frosting. I wish I could reach through the screen and steal a slice! You’ve outdone yourself!!! You should be extremely proud – I know I’m super proud of you! Willow and I watch a ton of cake videos on YouTube so it was fun for me to read this post and see familiar terms (crumb coat, bench scraper, dowels), but I haven’t come across any that used a paper towel to smooth and I honestly think that’s such a great idea! I really appreciate all of your hard work and taking the time to write up this post because I so enjoyed seeing the process and the amazing end result! Now you can add wedding cake maker to your lengthy list of accomplishments! 🙂 Love you, my dear! xoxo
Awww, my sweet friend, thank you SO MUCH for your amazing comment! It’s probably the longest tutorial in all of the land, bahahaha. I kept thinking, “is this too long??” LOL, but I mean, seriously, if you are going to share a tutorial for people, might as well make it pretty darn detailed and able to actually follow, right? I figured too many details is not possible and thankfully several have already made it with great success, so I don’t regret it one bit! Haha, I totally know what you mean, I’ve been there SO many times with cake trials. Nothing is harder than cakes since they are much longer than muffins, cookies, brownies, etc. so the details are SO important. Thankfully this one was an incredible joy, because, wedding cake, haha! Your description here: “little like pound cake…soft, tender, buttery, fluffy, kind of melts in your mouth delicious.” OMG, you nailed it girl, exactly. It’s exactly that, just not as heavy as a traditional pound cake, more light, but it’s definitely got a “pound” of fat in it, haha.
Thank you my sweet friend. Love you to bits!!
Today I learned that I never want to make a wedding cake… haha!! What an amazing tutorial you have put together, and clearly, from the visual appearance of the cake, your recipe is an absolutely perfect texture. I’m jealous of anyone who does attend the wedding where this is served. This really makes me appreciate all of the incredible hard work, knowledge and skill that goes into making such confectionery. Bravo.
You are so incredibly kind, thank you so much for the beautiful compliments! Haha, yes, it’s a lot of work. Definitely requires time and patience and a strong love for baking and cakes. Cakes are my very favorite thing to make, so I loved doing this! Also, it’s not something I’ll do often to this degree, so it was a fun project!
Hi Brandi! This cake is absolutely amazing. I love how beautiful it turned and it is very much appreciated!!! The one thing that blew my mind is not spreading the icing in between layers. I’m so confused! why do you not spread the icing? how does it get to the center of the cake?! i’m so intrigued!! -Kasey
Hi Kasey! I’m so sorry for any confusion! When you use the coupler and pastry bag, you just swirl the icing starting from the rim of the cake and swirl it all around until you get to the center. No need to flatten/spread it out. Doing it this way ensures your icing layer is even between each layer, as opposed to smoothing it out with a knife which often causes uneven spreading, which is visible when slicing. Does that make more sense?
This cake is amazing and looks like it came from a professional bakery. I was wondering what happens with the dowels when you cut the cake. Wouldn’t they get in the way?
Thank you!
Good question! I’ll edit the tutorial to mention that. Every wedding cake done by professionals use dowels. It’s very routine so the servers who cut the cake and serve the guests *should* know and expect the dowels and when they cut the cake, they remove the dowels. It’s necessary so the top tiers don’t sink into the bottom cake 🙂
ahh!! yes this makes sense now! thank you for the clarification! and i amos excited you posted the update on how to make them into cupcakes, as i am in charge of the desserts for my cousins baby shower and this will be perfect!
ahh!! yes this makes sense now! thank you for the clarification! and i am so excited you posted the update on how to make them into cupcakes, as i am in charge of the desserts for my cousins baby shower and this will be perfect!
Hi Brandi, I’m Colleen’s daughter! I certainly can’t begin to top my mom when it comes to crafting heartfelt thank yous, but I knew I needed to try. Not only was the cake absolutely perfect in taste and texture, but my mom was beyond ecstatic that you got this recipe to her in time. She kept me posted every single time you reached out to her with an update and each time I was blown away by all that you were doing for her. Baking has been her way of showing her children love for as long as I can remember, and as she said, my celiac and later veganism made that very difficult for her- until she found your wonderful blog.
Brandi, I can’t thank you enough for this amazing recipe. You fulfilled a mother’s dream for her only daughter’s wedding and I hope you recognize how profoundly that affected us! Thank you for making the most memorable day of my life that much sweeter.
Awww!! What a nice surprise & beautiful sentiment, Shaylyn. I am so honored and thankful Brandi helped me create a lifelong memory for you & Jordan! 💕
Awww Shaylyn, your comment made me tear up! Thank you so much for coming by and leaving this lovely comment. I’m so honored your wonderful mother contacted me for this request. She is one of the sweetest ladies I’ve ever “met” since I started blogging years ago and I’m always so touched to hear from her and you looked absolutely beautiful in your wedding photos and Colleen did a beautiful job. I’m so so happy you and everybody loved the cake, it really was my favorite cake to date that I’ve created. And I feel the same way as she does, I love love to bake for others and often bring treats because it’s a joy to bake for others as a way of showing my love. You are so blessed to have her as your mother and she is also blessed to have you as such a grateful daughter!
This is by FAR the most clearly written, meticulous and comprehensive step by step anything that I’ve ever come across!! It’s amazing. I actually feel like I could (if I ditched the kids for an entire weekend) pull this off.
The cake it and of itself is gorgeous. SO white! I need a piece now. (Poor me, ha!)
What I find to be the most impressive thing about this cake is the heartfelt story behind it. I finished reading Colleen’s message with tears in my eyes, imagining how I’d feel being able to do something so special for my daughter!
It’s incredibly generous of you to have been able to provide that for her and of both of you for sharing the story. Congratulations! Well done indeed!!
I wholeheartedly concur, Michelle! Brandi is generous beyond words for this meticulously thought out and detailed recipe that cannot be found anywhere else! I pray this skyrockets her to the recognition she deserves!!
Awww, just saw your response today Colleen, thank you so very much! You are a gem! I really appreciate that! Several have already made the cake and cupcakes now and I’m just so excited about it, so once again, thank YOU for asking!
Wow Michelle, thank you so much for such a kind and thoughtful comment! I’m so touched you enjoyed the tutorial so much. I know it is soooo long haha, but it bugs me when recipes are so short and not clear and with something like this, I figured more is better. It also helps prevent too many confusion and 10,000 questions I think overall. Yes, Colleen and her daughter are so sweet and were so patient and grateful that it was such an honor to do this for them. Truly!
Can I use this recipe for cupcakes? I need a gluten free and vegan cupcake for a family reunion coming up. Need help. Thanks
Yes, definitely! Give me a couple of days to update it with the cupcake exact details. I’m actually testing the cupcake tonight but I know it will work, just need to get specifics on the amount and number. 🙂
Hi Tanice, I updated the recipe with the cupcake version but I’m also going to be posting a separate post (with pics and all) as well this week so it’s even easier to follow!
THIS. This is incredible! With my GI issues, I had pretty much given up on enjoying cakes ever again. This is soooo beautiful. I love that I now have a go-to birthday/special occasion cake. Thank you for working your magic and putting in hours and hours to come up with this. I know it will be amazing!
You are so very sweet Dori, thank you so much for your kind words! I hope you love the cake!
That is absolutely beautiful!! You should be so proud. Stunning.
Thank you so much Hannah! That is so sweet of you! It was worth all the effort for sure!
Hi — super gorgeous. I’ve made regular wedding cakes in the past and this is a wonderful approach to the vegan version. Thank you so much for all the hard work!
I’m sorry but I cannot locate the regular all-purpose flour adjustment you mentioned as being in the Notes section. Currently the notes section only refers to using white rice flour. Am I missing this?
Cheers on your great accomplishment!!
Hi! Oops, I apologize on that. I added that knowing I was testing the all-purpose version and then it did not turn out nearly as delicious as the gluten-free version, believe it or not! So I did not add the actual recipe. I still plan to test it once more to see if I can get it just as good as the gluten-free, but honestly this recipe above is so amazing, I would just make this one, regardless if you are gluten-free or not. My reader Colleen (who I originally created the recipe for) said the wedding guests couldn’t believe it was gluten-free made with rice flour and starch! It truly just tastes like a magical wedding cake 🙂
Thanks for your response — I’m so impressed that the gluten-free version does better in the taste testing, so I’m inspired to try it. You do know that this recipe takes you to the rock-star level of vegan chefs, right?! Congrats!
haha,awww thank you! That’s so kind of you to say that!
The worst part about writing a thank you is when you can’t find the words to properly express how you feel.
Learning my daughter had illnesses and needed to switch to a GFV diet was devastating on many levels. Besides the most important concern of her health and well-being, I have always been a mother who, among other ways, enjoys showing her love through baking. Suddenly not being able to do so hurt my heart. To me, cooking for others is a very personal way to express love but I quickly became frustrated trying to figure out the complex science behind GFV cooking.
I was elated when I stumbled onto your blog 4 years ago, Brandi, and have been a loyal follower ever since. Besides sharing tasty, simple & easy-to-follow recipes, your gracious nature speaks volumes about who you are as a person!
In fact, I hesitated for a long time before requesting a wedding cake recipe because I knew you would work tirelessly to create one. I feel TRULY honored and humbled by your gifts of time and talent.
The countless hours you spent trying to perfect this recipe, the multiple trials that had you swimming in cake, the thoughtful interactions with updating me on your progress, only begin to describe your determination and generous spirit. You had so much going on in your own life but you selflessly strived to create and perfect this recipe AND get it to me in time. I reassured you it would be OK if it wasn’t finished but somehow you knew offering a cake to my baby girl & her husband on their wedding day meant SO MUCH MORE than that, and I will be forever thankful for your compassion and understanding.
Thank you, Brandi; more than words can convey, thank you. ❤️
Thank you so much Colleen for your amazing faith in me to create this for you! Like I said in my email, it was an honor. You are one of the most gracious and sweetest ladies I’ve had the pleasure of connecting with over the years! I loved the pics from the wedding and just beyond thrilled you, your daughter and guests all loved the cake so much and it all worked out perfectly. I was SO nervous as you know, so thank you again for reaching out and letting me come up with the recipe for you, as it sure has been a joy to create and EAT, haha! You are a gem Colleen! xx
Oh my goodness, Brandi, the honor is all mine! I’m just sorry you were nervous because I never had a moments doubt that whatever you created would be sheer perfection, and I was 100% correct! I hope every reader gives your cake a try; whether they need a special occasion cake or just something scrumptious to enjoy. Your finished cake is nothing short of a work of art and I look forward to recreating it, but I want to share that the base of this cake is easy to make and insanely delicious in its own right!
Holding the wedding and reception at my home gave me limited time to bake, so once I received your recipe I made two 9” circles and used store-bought VGF icing. I then used decorative large-crystal sugar sprinkles and washed rose petals to decorate the layers. It was not even 1/10 as beautiful as yours but it was still pretty, delicious and devoured by all! Just another testament to your impeccable recipes and directions, Brandi. Even those lacking in time or talent can create something special! 🍰💗
I loved yours Colleen, it was beautiful and I’m so honored you loved it so much! Makes me so so happy! And I loved that you had a chocolate icing that you layered in between, that sounded sooo good!! I updated the recipe with cupcakes too at the bottom of the NOTES section so a lot of people had asked and it will be much easier for those wanting something simpler 🙂
That was beautiful Colleen and made me teary. I’m so glad you were able to create this gift for your daughters big day and I’m truly thankful every day that Brandi is in our life. She knows how much she’s brought to my family’s life.
Thank you, Estee! I had to stop 3 times while writing to let the tears pass. How lucky are we that Brandi is so kind & generous as to share her talents with us? Like you, I am constantly thankful this amazing woman has chosen a life path that positively affects us all! 🙏
You and Colleen have also both brought so much joy to my life, so thank you!!
OH MY GAWWWWWWD!!!!!…..BRANDI!!!!……WOW!!!!…..This is nothing short of SPECTACULAR!!!….Just simply GORGEOUS! You know, one of these days, I have just GOT to try to make your recipe for this cake…..I’m divorced, and our wedding cake was almond-flavored pound cake which was SCRUMPTIOUS!! (This was WAAAAAY back in 1971) But that was my wife’s decision back then. I did love the cake, but SECRETLY always hoped for this type of WHITE cake….I am absolutely BLOWN AWAY by your creation…..You truly are such an ARTIST, Brandi, besides your amazing culinary abilities & creativity, your photos, your color schemes with dishes and “props”, etc., are all TOP-NOTCH, and I am an artist, so I KNOW WHAT I’M TALKING ABOUT!….Anyway….What a TREAT FOR OUR EYES TODAY (and, prospectively, for our STOMACHES!!) . . . The only thing I’ve ever TRULY loved about going to weddings over the years was the prospect of eating THIS KIND OF CAKE at the wedding!!….SOMEDAY, I am GOING to make it!! Thanks again darlin’…..YOU ARE THE QUEEN !!!!!!!!……love, Daryl
Ok, Daryl, I sent you a really long response and I don’t see it here! So, I will type it out again, haha! Thank you SOOO MUCH for your amazing, thoughtful and kind comment! You always brighten my day and the fact that you take the time to comment and read through this whole blog post means so much to me. You are so very sweet. I’m so happy you love it so much. And thank you for the compliment on the photos and style of the wedding scene too, haha, I really wanted it all so white and elegant, but simple at the same time, so I’m really happy it spoke to you 🙂 Thank you again for brightening my day Daryl!!
This looks amazing and I can’t wait to try it. I’ve been making cakes, but turned away a friend of mine because gluten free vegan is always so complicated. Also, gluten free is amazing for arthritis, so I am excited to try it SOON!
Thank you Sandy! Oh, this cake is SO easy to make. I mean, the building and the frosting part is a bit challenging but the actual cake recipe itself is ridiculously easy and simple! Let me know when you try it!
Thats so BEAUTIFUL ❤
Thank you so much Michelle, I’m so glad you like it!!
It looks beautiful! Vegan and gluten-free to boot, what more could one ask for?
I thought this would make a great anniversary cake for my husband and myself…I had wanted to do something for our 25th, last year, but found nothing that would work. I had high hopes for this one…until I read no substitutions. I’m good with the white rice flour, I could do that. It’s the corn starch. I’m allergic to corn and its by-products.
Oh well, I have seen one, and it is lovely. (You did a good job on the roses, I make them from gum paste and cold porcelain, just wanted to tell you, from someone that does it semi-professionally, i.e. I’ve sold some. 😉 )
Thank you!!!
Thank you Chrissie! I did note you could try potato starch for cornstarch. That would be the best sub. I’ve baked with all starches for years and they do all act a bit different, but potato starch is closest to cornstarch. It does make things a bit more tender/crumbly and dry out quicker, so what I would suggest is to test the recipe as just 1 8 inch layer cake (divide the recipe by 3) and use the same weight amount as the cornstarch for the potato starch (so divided by 3 it would be 64g). Follow the instructions on how to flip it, cool completely, wrap it well in plastic wrap and chill it just the 30 minutes, then trim it and ice it. Then cover it completely in a dome to stay moist at room temperature. See how you like it and test a piece also the next day. I think it would be a close result, but will be more tender and dry out quicker.
I’ve already told you over on Instagram, but this cake is just absolutely gorgeous. You did one heck of a job Brandi, congrats! I’m so happy I’m not married yet – because now I get to possibly try this for my own vegan wedding haha! Thanks again for such a great recipe. <3
You are just the sweetest Jen! Your kind compliments are so appreciated. I’m so happy you like it and you totally cracked me up with your comment, lol!
Dear Brandi,
I am a cake baker and had a request for a Gluten Free and Vegan cake. I myself am gluten free, but unfamiliar to vegan baking. I had such a hard time finding a good recipe to help make this cake! (Made 3 different kinds of cakes) I understand all the chemistry that go into baking.
And all the characteristics that an ingredient can add. Everything that I baked turned out gummy and chewy. Nothing that you want in a cake. I finally found your recipe. I should have used your buttercream recipe as well. But I had made a vegan Italian Buttercream made with aquafaba before finding you. I made your cake and ate the trimmings. SO DELICIOUS!!
Every detail that you put into it for example; not overheating the coconut butter. I read that detail after I warmed it in the microwave and I think I did overheat it a tiny bit ☺️ Because it was a bit mealy like you said! 😅 I told myself ‘oh geez I’m not making a cake for a 5th time!’ It was still so yummy!!
Thank you for sharing your time and effort. I understand it takes a lot of patience, knowledge, and money to develop a recipe. Cause you know you end up throwing food away sometimes!
Bless you Brandi!
Although I will never attempt to make this it looks absolutely beautiful. Kudos to you for even trying this. I see a new career. Good luck!!!
Haha, yes, it’s a lot of work! Thank you so much Robyn, so very sweet!